
Dashboard Replacement
If you have a cracked dash, you can either live with it, put a cover on it, or replace it. I have not heard of a reliable way to repair cracks. If you decide to go the replacement route, I suggest not even considering a used dash. You don't know where it's been, if it's been maintained, etc. They crack suddenly from what I know. I would hate to think of going through the work required to replace your dash, and then have it crack again soon thereafter. Go new. One source for new dashs is Maximillian Importing Company. My E28 dash cost around $500 shipped from Germany.
The procedure is not terribly difficult, but requires major patience, meticulous attention to detail, and most of a day. I would also recommend a case of pilsner from Munchen and a helper (bribe helper with pilsner). I did it solo, and it took me about 8 hours total. I would say if I did it agian it might take 6. If by some chance you need to replace your windshield, it would be much easier to do this job with the windshield removed (like it's done at the factory).
Before you begin, PLEASE BUY A BENTLEY'S MANUAL. It does not cover dash replacement per se, but does cover alot of the sub assemblies. If you have an out-of-warranty BMW, you should have one anyway. It will pay for itself many many times over. Just get one.
What you need:
1. rivet gun
2. 5/32" x 1/4" long aluminum rivets (11)
3. 1/8" x 1/2" aluminum rivets (2)
4. Drill w/ 1/8", 5/32" bits
5. small phillips and flathead screwdrivers, large flat head screwdriver
6. wrenches, 8mm, 10mm (sockets and boxend - your car has 'em in the toolkit) 22mm (socket, 7/8" works ok), straight driver handle and ratchet handle.
7. 3M trim adhesive, recommended for sticking some of the insulation to the new dash.
8. box of ziplock sandwich bags
9. indelible marker
10. vinyl treatment (recommend Meguiars #40)
11. Window cleaner.
12. Assorted towels/rags
13. did I mention pilsner from Munchen?
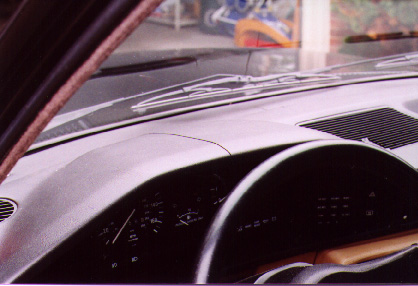
Here is what my dash looked liked. These are the typical places for cracks. The instrument cluster crack can allow your cluster to squeak against the dash, very annoying. You can fix this temporarily by removing the cluster and rubbing some vaseline around the edge. Why do they all crack? As far as I know, UV weakens and makes the vinyl coating brittle. The cracks can actually occur as a result of core expansion. For instance, If your dash is cold, and you crank the heat, the core will expand some, and the brittle skin cracks. The key is use a sunshade and keep the dash coated with a non-silicon UV inhibitor.
Ok, let's go. If you want to do it right, place everything small in individual ziplock bags and label them. If you do this, you will have exactly the right number of screws etc. when you reassemble. If you don't do it, good luck. I put all removed parts in my trunk, safe from marrauding children animals wives, etc. For more detail on some of the below procedures, please see Bentley's.
** Disconnect the ground lead from the battery before you do anything! **
1. Remove the steering wheel. Pry up the center emblem and use a 22mm or 7/8" socket to remove the nut. Wheel pulls straight out.
2. Remove instrument cluster, 2 small screws at top of cluster, then use flathead to pry it out of dash. Carefully unplug all wires from the back. the large connectors have black clips that must be pryed upward with a small screwdriver before the connectors will come out. The picture below shows some of the larger connectors, you can see the clip on the white one. There is also a small black plastic "door" the pulls out from back of cluster and allows removal of 3 smaller connectors. You'll see what I mean. Be careful not to scratch the window on the cluster while doing all this.
3. Remove the OBC/hazard panel and the left vent. These are held on with 2 screws each, visible after cluster removed. The vent just pulls straight out. You will need to unplug the wires from the OBC and the hazard/defroster switches. Recommend labelling all connectors to make it easier later. If your OBC is dim, now you can replace the light bulbs in the back (see Bentley's).
4. Detach driver's under-dash panel. Several screws. You can just undo all the top and side screws, and let the panel swing downward without completely removing it. Here is what it'll look like at this point. 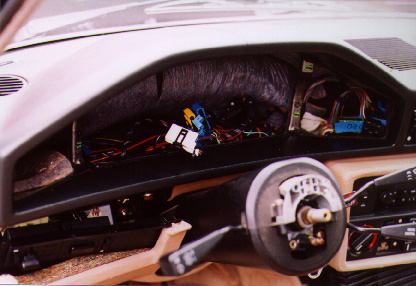
5. Remove the glovebox. It's attached at hinge w/ three 8mm bolts. These screw into flat little rectangles of metal that act as nuts. They are loose, so don't lose 'em. Remove the vinyl "curtain", just slips off of back of glovebox, held on to metal bar above with two plastic rivets. Pop the pins out of the two front straps. Push the flashlight charger socket down through its mount, remove two metal clips from wire, and the box will be free. Remove screws/bolt that hold latch assembly to the dash. Remove the plastic panel to the left of the dash (2 screws).
6. Remove A-pillar trim panels. You really don't need to loosen the headliner to do this. The pillar panels only stick about 1/2" behind the liner, so you can bend them in the middle and pull it out. You also need to remove the portion of the door seals that covers the pillar trim. It just pulls off. Pull the pillar panels straight up and out of the dash. There are foam inserts near the windshield which also come out. Note that the panels fit between the dash and a metal clip. This is the top of the actual bracket that bolts the dash to the car.
7. You are now ready to free the dash. But first, you may want to look and commit to memory how the dash is lined up in your car relative to the doors etc., as you have some abilty to adjust the new dash's position when mounting . Remove the bolt on either side of the center console, and the associated spring-nuts. Remove the bolt from the bracket above the steering column. Unlatch the center airbox. You will see a clip on each side similar to that on the air filter box under your hood. Most of the ventilation ductwork comes out with the dash. Now look for the bracket on each side of the car, held onto the body with two 10mm bolts. Remove them, and the dash is free. Getting it out is another matter. Also note that there is a metal springclip at the front of the dash just left of center that just pops out without any extra effort.
8. Get it out. Here is what it'll look like at this point: The towels are there to protect the leather center console from the 2 metal clips on dash. Also note I removed the center vent, this is not necessary yet and was mostly an accident. I have raised the dash up, and this is where I got stuck. 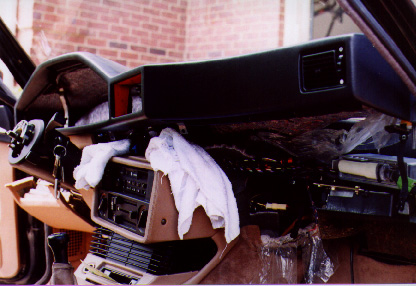
The problem is that the dash hits the windshield, and there are two ventialtion ducts, attached to the dash, that protrude downward and won't easily clear a metal cross bar which is welded into the car (and has tons of wiring tied to it). No windshield, no problem. After contemplating calling the autoglass boys, I got in there with the big flathead screwdriver. If you pry the ducts upward from below, they will pop over the metal bar, and you are home free. BE CAREFUL! The plastic ducts are attached to the dash by 8 small screws which are not removable while the dash is in the car. The plastic ducts will break at the screws if torqued too much. Don't try to yank it out by the dash itself, the ducts will snap. Get outside the car on your knees, and shove one arm between the dash and the "shelf" on the firewall. Use your forearm to lever the dash up from below. At the same time, use the other arm to pry the duct with the screwdriver. Be patient, a helper is a plus. Here I am relieved that I don't have to have the windshield yanked: 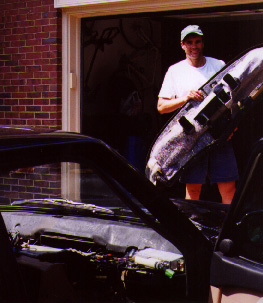
You can see the two rectangular ducts that get caught on the metal bar. Up to this point, it should take 2-3 hours. Less with a helper. Here is what your car will look like: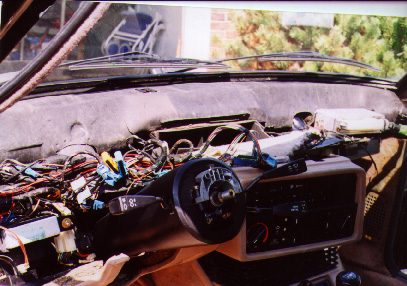
In the immortal words of David Byrne, "My god, what have I done?!"
You can see the black rectangle near the center windshield, which is where the spring-clip fits in.
Spread a large dropcloth or several towels out as a smooth place to tranfer stuff from old dash to new. Have a(nother) beer. Here is the new dash: 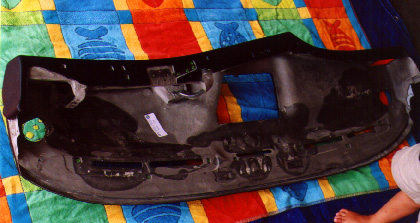
9. Remove the little trim piece from the old dash that fills the space above the steering column (if you haven't already, 2 screws). DO NOT put it on the new dash, save that for after it's in the car. Take a good look at how the ductwork fits in the old dash. The top-center vent comes out w/ 1 screw, and beneath it are two screws for the airbox. The back of the airbox just clips to the dash with 2 plastic tabs. The center vent just snaps on to the airbox duct. Unsnap and push it out of the dash from behind. Same with the passenger vent. Now the airbox and it's associated ducts will come out. Only pull up insulation where you have to. The series of ducts closer to the firewall are screwed to the dash with 8 screws. It is also slid-over the two round-top vents. These are fastened w/ 1 screw each. You will need to lift up some insulation to access all eight screws/washers, and the round vents push out from below. At this point all ducts are out. Now carefully peel up any remaining insulation and put it in your new dash. Here is where some trim adhesive may come in handy.
10. Drill out the rivets for the 2 side and 1 center bracket (5/32" bit), and the VIN (1/8" bit) tag. Here is a close up of one of the side brackets next to the new dash.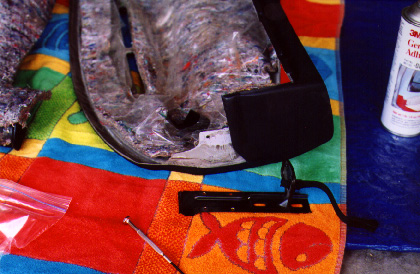
There are 4 rivets in each side bracket, and the new dash will have 4 matching holes. The center bracket has 3 rivets. Rivet the 3 brackets to the new dash with 5/32" x 1/4" aluminum rivets. rivet from the inside out on side brackets. If you use longer than 1/4" rivets, I don't think the dash will fit in the car. Be careful to make sure you have oriented the brackets the right way, it's pretty obvious though.
11. You will have to drill your own holes for the VIN tag. I took rough measurements off the old dash, and drilled two 1/8" holes. BE CAREFUL. The dash consists of an aluminum plate coverd by foam and vinyl. If you drill at an angle, the bit will slide on the aluminum and mar the dash surface. Drill carefully straight down, then rivet the VIN tag w/ two 1/8" x 1/2" aluminum rivets. At this time you can also swap the metal spring-clip at the front of the dash, it just slides out.
12. Use this opportunity to clean out your ducts, vacuum your car around the dash, and clean the windshield. Also give the new dash a good coat of protectant. Beer anyone?
13. Install the ducts in the new dash. You may want to do a dry run, there is really only one good way to do it so that everything snaps together and you can still access the 8 screws. I don't remember the exact order, but it'll be obvious. Glue any insulation that's hanging loose.
14. You are now ready to put the new dash in the car. Helper here is very useful, so you can do both sides simultaneously. Once again, you will have to fight the ducts to get them in, once again, be careful. Use your screwdriver prybar. Once the ducts have cleared the metal bar, you are almost there. But you need to match these 2 ducts to their mates in the car, and the center airbox has to mate as well. It's not too tough, the side ducts just slide over the in-car ducts, and the airbox fits inside the center in-car airbox. Fasten the airbox clips. these should be easy to fasten. If they are tight or don't stay shut, something is not aligned. Use a flashlight and a screwdriver to make sure the ducts meet properly all the way around. Also try to make sure the metal spring-clip finds its socket on the firewall.
15. Bolt the brackets to the car. Pay some attention to how the dash lines up with the door trim etc, because the brackets have some adjustabilty built into them. I just pushed mine up as high as they would go. The driver's side bracket has some additional brackets that are also held on by the one of the 2 screws, don't forget these, they will be hanging on some wires. Attach the center bracket, and attach the two bolts on either side of the center console (you will have to slide the metal spring-nuts onto the metal dash tabs first).
16. At this point, reassembly really is the reverse of removal. It goes back together quite easily. You may have to play with the glovebox latch a bit to find the right spot for it, no big deal.
17. Make sure everything still works, reset your radio, OBC. Go for a drive. Marvel at how much faster you car is. Beats the crap out of a cone filter and new exhaust. Doesn't it?
18. Finish remaining beer, you deserve it. 
Good luck. I hope this helps a few people.
My thanks go to Ron W and Chris Graff, as well as some others, for their instructions which got me through this project. If I hadn't known in advance about some of the obstacles I would encounter, I believe I would have broken into tears at several points along the way.