Hydraulic Accumulator (Brake Bomb) Replacement
The brake bomb invariably quits in all old BMWs. What are the symptoms? You usually first notice it during a panic or fast braking situation. Your brake pedal feels hard, the brake light on the dash may flicker, and most disconcerting, there is a time delay until the brakes grab. If left untreated, you could easily wind up rear-ending someone.
As I understand it, the bomb is basically a little two-part pressure chamber with an internal diaphragm. On one side is pressurized nitrogen gas. On the other side is ATF that gets pumped in by your power steering pump. Because the pump can't react quickly enough to emergency braking, the bomb is there to help. The bomb goes bad because the nitrogen leaks out over time or the diapragm fails.
When you check your ATF level in the power steering reservoir, you shut off the car, remove the reservoir lid, and pump the brake pedal 10-25 times until it gets hard. As you do this the fluid in the reservoir rises. What is happening is the bomb is emptying some each time you hit the brake pedal. When the pedal feels hard, the bomb is empty. Hence, if your bomb is bad, ithe pedal feels hard from the first pump. Also, your fluid level will not rise in the reservoir.
A new bomb costs between $60 and $100 typically. Shops usually charge 1.5-2 hours labor, you can do it in an hour or less if prepared. Some shops do it very quickly (with an air chisel, see below) and only charge a 1/2 hour or so, which may be worth it.
Before you begin, PLEASE BUY A BENTLEY'S MANUAL. It does cover this procedure, albeit with little detail. If you have an out-of-warranty BMW, you should have one anyway. It will pay for itself many many times over. Just get one.
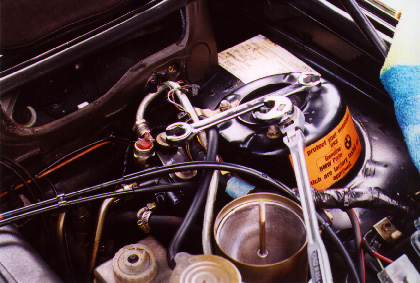
The procedure is generally considered a PITA, because there is no working space where the bomb is mounted, and everything is VERY tight. So where is the bomb anyway? It's just in front of the firewall on the driver's side, hanging beneath the power flow regulator. It can be identified by the two pressure sensors with red plastic caps that are screwed into it. The bomb hangs below this thing, hiding down there in the dark. It is about the size of a softball, and painted black. Chances are you have never seen it unless you have looked for it. Here is a picture of the top of the regulator with the red switch.
It is held with two gold bolts and washers to a very flimsy metal bracket. You can see one of the gold bolts beneath the double-ended flare wrench.
There is a short and a long way to do this job. Unfortunately, it is quite difficult to do it the short way, which involves removing the bomb without removing the regulator. Problem is the bomb is VERY TIGHT in most cases. The torque spec is only like 36 ftlbs, but it gets tighter with age. I estimate it took something like 80-100 ftlbs to loosen mine. This tightness combined with zero space to manuever makes it tough to get it out without removing the regulator.
If you want to try the short way, you need to make a tool. In fact, you need a tool like this or a plumber's chain wrench even if you take the regulator out. Here is a tool made by Walt Suman. Below it you will see my version. 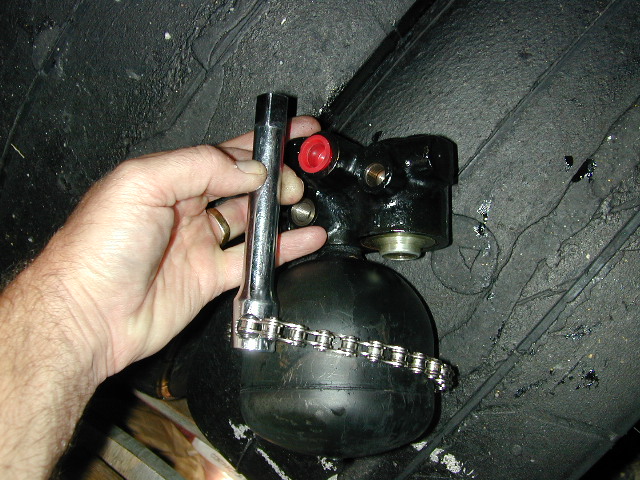
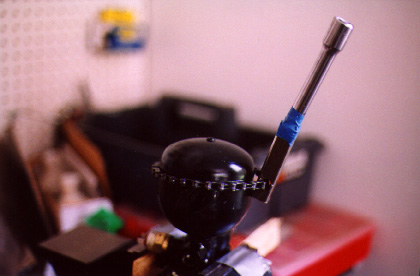
Here you can also see the bomb and the regulator. It is right-side-up in Walt's picture, and upside down in mine because I have the regulator clamped in a vice. (the long method). Basically, you need a loop of chain that will grip the bomb, and a way to torque the chain with a breaker bar. I made mine with a section of square pipe from a store-bought oil filter strap wrench. Drilled some holes in it and put a piece of bicycle chain through 'em. Walt's is similar, he used a 1/2" socket extender and what looks like motorcycle chain.
Additional things you need:
1. turkey baster or fluid pump (Sta-Lube, a few bucks at auto parts store)
2. Automatic Transmission Fluid (ATF) 2 quarts to be safe
3. Custom tool or plumber's chain wrench.
4. Metric flare wrenches (long method only). What is a flare wrench? It is a wrench that grabs a nut by the flats instead of just the points. The hydraulic fittings attached to the regulator are brass and very tight, a regular wrench WILL round the nuts off, in which case you are SCREWED. Crowfoot flare wrenches are better, because you can get a better angle on the nuts. You can see both a double-end flare wrench and a crowfoot (attached to a ratchet handle) in the first picture. You need 12mm, 17mm and 19mm, so get a set. I found my crowfoot metric flare wrench set at NAPA Autoparts, for $17. Don't bother looking at Sears, Home Depot, or Lowes, but they do have the double end metric flare wrenches. You will also need a 13mm socket for the mounting bolts (you can use the 13mm from your flare set)
5. needle-nose pliers
6. a breaker bar or pipe and/or a big-a*s ratchet handle.
7. A strong lower back, as you will be hunched over in an awkward position while under the hood. You'll see.
SHORT METHOD
Walt Suman was able to do his this way with the tool shown above. I was not successful.
1. With motor off, pump brake pedal until very hard (15-30 pumps normally, but if your bomb is shot, pedal may be hard immediately).
2. Open reservoir, remove c-clip that holds screen in, remove screen, and pump most of the fluid out. This makes it much less messy.
3. Unplug the sensor wires from the two switches and from the top of the brake fluid resevoir. Tape them up out of the way.4. Manuever your tool so you can bring the chain loop up and around the bomb. Orient it so you can get a breaker bar on it.
5. This is where a helper would come in handy. You will need to really haul on the breaker bar. Problem is, the regulator is mounted with rubber bushings so it moves. On top of this, the bracket can be broken easily. So you need someone to hold or brace the regultor somehow. Then you need to really reef on your breaker bar. If you're lucky enough to break it free (without breaking something else), it can be unscrewed by hand, and manuevered out.
6. BE SURE TO PUT THE INCLUDED O-RING OVER THE THREADS OF THE NEW BOMB - forget this and you will get to do the job twice, not mention have a big mess. Thread it into the regulator, put your tool on it, and torque it to 36 ft-lbs or so. DONE!
LONG (usual) METHOD
See steps 1 - 3 above.
4. Use your flare wrenches to loosen all 4 of the hydraulic lines from the regulator. You may want to stuff a rag down beneath the regulator, as some fluid leaks out (not too much tho since you drained the reservoir). The toughest ones in my case were the two that face the firewall - the lower one is VERY difficult to get to, and VERY tight. I had to use a breaker bar on the 17mm crowfoot to break it loose. Loosen these two before loosening the two that face the engine, as you can use these lines as handles.
5. Loosen the two gold bolts that hold the regulator to the bracket. BE CAREFUL THAT THE BUSHING/WASHERS that the bolts fit through don't drop out and disappear into the bowels of the car. One of mine fell out and it took 45 minutes to find it. It is amazing where these things can manage to get stuck. Support the bomb from beneath as you remove the 2nd bolt, and then manuever the whole assembly up and out of the car.
6. Flip the whole assembly upside down and place it in a vice with soft jaws (between two pieces of wood etc.) Put your tool on the bomb and whale away. Try to use some impact to break it free. Once it loosens, unscrew it, PUT O-RING ON THE NEW BOMB, and thread it in. Torque to 31-36 ftlbs. (Note - this is also a good time to replace one or both of the pressure switches which tend to leak over time - torque to 11-13 ftlb)
7. **IMPORTANT TIP** Before lowering it back into the car, use a swab to carefully clean the inside mating surfaces in the regulator where the hydraulic lines attach. If you get a piece of grit in there, the hydraulic line flare fitting may not seal. The first time I did this the high pressure line (the 17mm one that faces the firewall) had a slow leak. I had to take the regulator out again (@$#*&@!), clean the surfaces, and reinstall to stop the leak. I would also recommend wiping the ends of the hydraulic lines before inserting into the regulator.
8. **IMPORTANT TIP #2** Do not fasten the regulator to the bracket until you have attached the high pressure line. This is the lower (17mm) line that faces the firewall. It WILL NOT thread in to the regulator if the regulator is mounted to the bracket. Suspend the assembley in the space between the bracket and the brake fluid reservoir with your left hand, pull the high pressure line out to meet it with your right hand, and thread it into the regulator (try to ignore the pain in your lower back). It will thread in easily by hand once you get it aligned right. You can then manuever the assembly beneath the bracket and thread the mounting bolts into it. Just hand tighten them until you have the remaining three hydraulic lines threaded.
9. Tighten all lines by hand, then torque the mounting bolts. Finally, torque all 4 lines: 12mm - 11-13 ftlb, 17mm (facing engine) - 33-36 ftlb, 19mm - 22-29 ftlb, 17mm (facing firewall) - 18-25 ftlb. Good luck getting a torque wrench on this last one, I couldn't. Just had to guess.
10. Put the screen back in the reservoir, reattach the c-clip, and refill reservoir with ATF until it gets within 1 cm of the top of the reservoir. Tighten the lid, and start the engine. Let it run for a while, drive it around the block, whatever. Shut off the motor and check for leaks. Then remove the lid from the reservoir and pump the brake pedal til hard. If the fluid doesn't come within 1 cm of the top, add more until it does. YOU'RE DONE. Enjoy the return of great braking response.
Good luck. I hope this helps a few people.
My thanks go to Walt Suman, as well as some others, for their instructions etc. which helped me through this project.