| Welcome to the Acoustics Page! |
Room Acoustics
Reflections
Diffusion
Standing Waves
Room Gain & Corner Loading
Subwoofer Placement
Optimum Dimensions
Homemade Traps and Diffusers
SoundProofing
Sound Transmission
Mechanical Sound Transmission
Construction Tips
Acoustical Sound Transmission
Construction Tips
HVAC Construction Tips
Room
Acoustics
Reflections and standing waves are the dominant problems that destroy a
natural sounding 3-dimensional image.
Acoustic absorbers (acoustic foam, drapes, heavily upholstered furniture, etc...) will help control reflections. However, if we eliminate every reflection, we would essentially have an anechoic chamber which would not sound natural. A certain amount of reflections are still acceptable for the room to sound "normal." We primarily want to eliminate the initial early reflections. Acoustic foam tiles, drapes and tapestries may be placed behind the speakers, behind the listening area, on the side walls and on the ceiling. A carpeted room goes a long way toward controlling reflections. Don't try to cover whole walls, etc... Instead, strategically place individual tiles at points that reflect toward the listening area. An easy way to visualize this is to have an assistant place a mirror on the side walls (ceiling, back wall, etc...), and move it around until you see the speaker's reflection. Place acoustic absorbers at those locations. Don't forget about ceiling reflections from the left and right speakers AND especially the center channel. Sparsely place individual absorbers at various other locations.
As stated before, too many absorbers will begin to make the
room
sound unnatural. To avoid this, a better solution is to use
diffusion to spread the reflection around rather than absorbing
it. With diffusion, the waves are still reflected, but
instead of
a clear reflection of parallel (in-sync) waves, the reflections are
spread out in different directions so that there is no direct
reflection back toward the listener. Diffusers can be
purchased,
but it is much easier (and aesthetically acceptable) to use objects
in the room as diffusers. Sculptures, furniture, wall mounted
knick-knack shelves and bookshelves (with randomly spaced book
groupings as opposed to completely filled) make excellent diffusers.
Standing waves are a much more difficult problem.
These are
waves which bounce back and forth between parallel walls.
They
set up a resonance such that the bass wave appears to be "frozen" in
space, and you can walk into an area of a crest which will sound boomy,
or you can walk into an area of a rarefaction (sag in the wave) which
will sound as though the bass disappears. Standing waves
occur at
a frequency equal to twice the distance between the walls (a trip from
one wall to the other and then back) divided into 1130 ft/sec. (the
speed of sound). We can try
to build rooms to specific ratios, build non- parallel walls, and
partially break rooms say with a staircase or partial wall offset from
the middle of
the room. However, studies are revealing that so-called ideal
room ratios are not much better at controlling the problem than other
ratios except for the notorious square room to be avoided at all
costs. It usually isn't possible or aesthetically pleasing to
build non-parallel walls. Equalizers aren't much help as
other
frequencies are usually affected too much, unless it's a parametric
equalizer. Some audiophiles will place their speakers at
third
points and the listening chair at the other third point in the
room. While this isn't possible in most rooms, try to keep
the
listening position away from the rear wall by at least a few
feet. One way to help alleviate room problems is to use
satellite/subwoofer systems. The main speakers (satellites)
can
be placed away from walls while the subwoofer can be optimally located
for bass and control of standing waves. Try to keep the
crossover
as low as possible. 40 Hz to 60 Hz is ideal with 80 Hz still
being
a reasonable compromise especially if crossed over with high slopes
(18 dB to 24 dB/octave). As a side note, subwoofer placement
is
easier if you place the sub at the listening position (in the listening
chair). Now crawl around the room and listen for the most
optimum
bass - a compromise of smoothness and deepness. Various types
of
bass traps can help (see below).
Many people still have a misunderstanding of these
phenomenon.
Corner loading is actually related to baffle step diffraction in that
bass energy
is redistributed. Whereas in baffle step, the bass
rolls
off by 6 dB because it "wraps around" the speaker enclosure instead of
reflecting forward with the treble energy, room gain and corner loading
in particular increase the bass because it is being "funneled" into a
smaller angle of dispersion. Picture a speaker out in the
open
away from any surfaces (walls, ceiling or floor). Assume the
driver is capable of radiating 360° at all frequencies.
Technically, this driver will have a certain SPL at 1 watt.
Because it is on a baffle, at some point as the frequency increases
(roughly the frequency whose
wavelength is equal to the baffle width) it will start radiating the
rear energy forward, because it is "reflecting" off the
baffle.
Let me rephrase that - 180° of the radiated sound energy is now
being radiated forward and in-phase with the other 180°. The
SPL increases by 6 dB as the frequency gets higher. This is
baffle step. Actually, the SPL of a loudspeaker assumes sound
is
radiated forward into half-space. Therefore, to be more
accurate,
it is better to say that sound decreases 6 dB with decreasing frequency
as bass radiates into a full 360°. When sound is radiating
360°
it is said to be radiating into full (spherical) space (4π
steradians). When you place this speaker against a boundary,
say
the floor, you
are now radiating into a hemisphere or half space (2π
steradians) and the SPL increases by 6 dB. When this speaker
is
placed at the junction of the
floor/wall, it is radiating into a quarter sphere or quarter space (π
steradians) and the SPL increases by 6 dB. When you place the
speaker in a corner, it is now playing into one eighth space (π/2
steradians) and again, the SPL increases by 6 dB. This means
a
theoretical increase of bass on the order of 12 dB (from half space to
quarter space, then to one eighth space) if the speaker is placed in a
corner. In reality, rooms have doorways and windows and not
totally rigid walls and speakers that are generally a few feet away
from the walls. All these factors allow for some loss of bass
so
that corner loading usually contributes around 7 to 9 dB of gain in the
bass frequencies beginning around 50 Hz or so for small rooms down to
maybe 20 Hz or so for large rooms.
Technically, true room gain (a 12 dB/octave rise as frequency
is
decreased) is a pressurization effect that kicks in at 565/L Hz, where
L is the longest room dimension (actually the lowest standing
wave). It's effects are probably not developed to any great
extent in most rooms (except for cars), but this and corner loading act
together to extend bass response for about an octave. When
speaking about room gain, I think most people are talking about both
effects combined.
Room gain (including corner loading) is generally beneficial. It allows us to have truly deep bass by using speakers with a modest F3. For subs, if you design a sealed sub that has an F3 near 30 Hz, you will have in room response to below 20 Hz. If you design a speaker to have very low F3 (say 20 Hz), then room gain and corner loading will kick in to make your sub boomy at around 30 or 40 Hz. Some may like the boomy effect, but it is not accurate. It is best to take into account room gain and corner loading if you design for deep bass. Don't be overly preoccupied with formulas for affected frequencies. Just be aware of these effects and choose an appropriate design. Generally we are talking about frequencies of around 30 to 50 Hz, so I tend to use the following rules of thumb:
| Desired
F3 |
Sealed
Speakers |
Vented
Speakers |
| Above
40 Hz |
Design
for a
Qts=0.7 |
Design
for a
flat QB3 alignment |
| Below
30 Hz |
Design
for a
Qts<0.6 |
Design
for
an EBS alignment |
There have been many optimum dimensions recommended for
rooms.
As mentioned above, studies are showing that optimum dimensions are not
the cure all for controlling acoustic problems, though the square room
should be avoided (8' W x 8' L x 8' H). However, as with
anything
else DIY, every little bit helps. Here are three recommendations
gleaned
from various sources:
| Ratio
#1 |
Ratio #2 | Ratio #3 | |
| Height |
H |
H |
H |
| Width |
1.14xH | 1.28xH |
1.60xH |
| Length |
1.39xH |
1.54xH |
2.33xH |
For normal 8' ceilings:
| Ratio #1 | Ratio #2 | Ratio #3 | |
| Height |
8' |
8' |
8' |
| Width | 9' |
10.25' |
12.8' |
| Length | 11' |
12.3' |
18.64' |
For 10' ceilings:
| Ratio #1 | Ratio #2 | Ratio #3 | |
| Height | 10' |
10' |
10' |
| Width | 11.4' |
12.8' |
16' |
| Length | 13.9' |
15.4' |
23.3' |
Ratio #3 seems to be one of the better ratios. I
have often
seen people with floor dimensions of 16'x20' or 16'x24'. I
have
also seen people recommend using different prime numbers as recommended
ratios.
(Soon!)
SoundProofing
Sound Transmission
Sound transmission occurs mainly through direct acoustical
transmission or through mechanical transmission. Acoustical
transmission is basically the direct sound wave. If there is
an
unbroken path through the air to your ears, you will hear it.
Even though you close a door, sound still travels under the door or
around the edges through the air. Mechanical transmission
occurs
when the sound wave in the air meets a solid structure and vibrates the
structure. This occurs at walls. The sound vibrates
the
wall which then vibrates the studs, which then vibrates the outer
wall. The outer wall will act like a transducer and
transmit the sound. Following are some home construction tips
to
help control sound transmission, but first, some definitions.
STC
(Sound Transmission
Class) quantifies a material's effectiveness at blocking the
transmission of sound. Expressed in dB, it generally applies
to
hard materials. The higher the number, the better it blocks
sound. Note that 3 dB is barely perceptible, but 10 dB is
twice
as
loud (or half as loud as the case may be). This means an STC
50
wall is four
times quieter than an STC 30 wall. This is the
most common
way walls are rated.
NRC
(Noise Reduction
Coefficient) tells us how much airborne sound a material absorbs.
Expressed as a decimal, it generally applies to soft
materials.
The higher the number, the better the material is at absorbing sound.
Normal conversation can be heard and understood through a wall
of
STC 25 - basic wood stud wall, no insulation or caulking.
Loud talking not heard through a wall of STC 50 - achievable with
reasonable care and special construction techniques.
Loud shouting can be heard, but not understood through a wall of STC 60
- very difficult to achieve, but possible with care in installation.
Recommended wall STCs:
bedroom to bedroom - STC 48
bedroom to adjacent kitchen - STC 52 (STC 58 would be optimum).
Mass and dead air space are the most important things for
stopping
the
transmission of sound from one place to another.
Note that breaking dead air space into (more) smaller spaces may
actually make the noise transmission worse. In walls, the
transmission loss depends on mass (and stiffness) of the (outer)
surfaces and on the thickness of the airspace between them. Mass
and dead
air are your friends!!!
Return
Mechanical Sound Transmission
Construction Tips
The best method
of
mechanical isolation is to build two walls adjacent to each other with
a dead air space between them, and no cutouts (electrical boxes,
etc...) in the wall. Period. However, since this is
impractical for most home owners, two other methods are nearly as good
(essentially the same). One method involves building walls
using
2x4's on 6" top and bottom plates. The other method uses
resilient channel under the drywall to break the mechanical connection
to the stud. Briefly I'd like to mention that using double or
triple drywall layers or thicker drywall (increasing wall mass) can
also help control sound, but the following methods offer the most
protection from sound transmission.
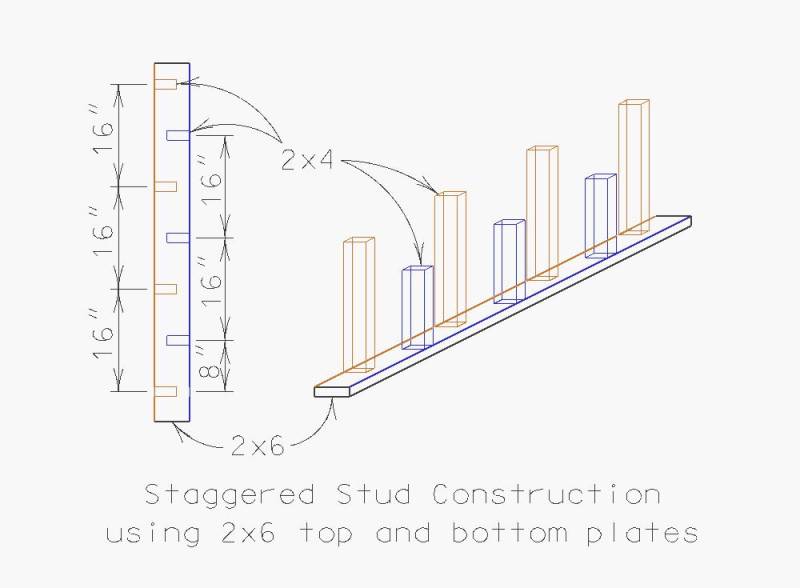
Staggered
studs
Staggered stud construction requires building 2x4 walls on 2x6
top
and bottom plates (Click picture
above).
Essentially, two walls are built instead of one, but sharing the same
6" wide top and bottom plate. Each wall's studs are offset by
8". This breaks the connection between the two
walls. Even
though they share the same plates, there's no real connection of the
vibrating surfaces (the walls are pinned at the top and bottom which is
not as critical a connection). In the picture, the tan studs
connect to drywall
on one side of the wall, and the blue studs connect to the drywall on
the other side, but neither set of studs touches the other's
drywall. The primary drawback is with respect to windows and
doors. Normal walls are about 4 1/4" wide (3 1/2" stud plus
two
sheets of 3/8" drywall). The 6" top and bottom plates
increase
the thickness to about 6 1/4". This precludes normal door
jambs
and window jambs. Basically an approximate 2" strip would
need to
be added to the jamb before the casing (trim) is applied.
However, bare walls (ones with no windows or doors or other openings)
should present no problem. There's just the cost of the
second
set of studs. For new construction, this is an excellent way
of
soundproofing a particular room (say a home theater room) and isolating
it from the rest of the house.
Resilient
Channel 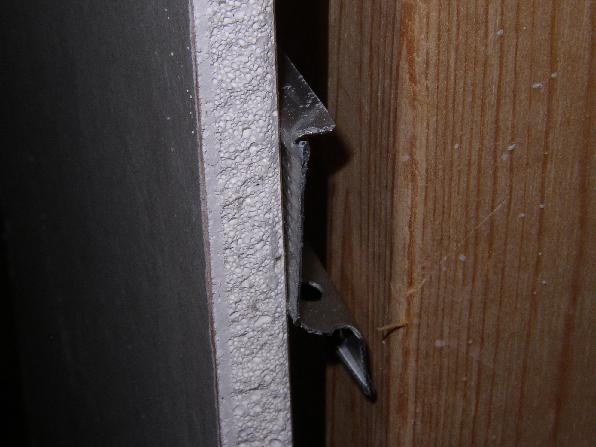
Resilient channel (click picture
above)
is another way to control sound transmission - by breaking the sound
path from drywall to stud. It acts like a shock
absorber.
It is a metal strip
attached to the studs with the "nailer tab" side down. This
is
important! The small "nailer tab" should be down so that the
weight of the wall "floats" away from the studs. The drywall
is
then screwed to the "wide" flange of the strip rather than directly to
the studs.
This greatly reduces sound transmission. Resilient
channel only needs to be applied to one side of the wall. Be
careful not to screw drywall where there's a stud. Otherwise
the
screw
may go into the stud and rigidly attach the drywall to it.
You
may use screws to attach the channel to the stud. Just make
sure
not to accidentally screw the drywall through the channel to the
stud. Again, the
main drawback is the extra wall thickness that may affect window and
door jambs. Resilient channel will add about 1/2" to the wall
thickness. Also, do not place it closer than about 6" to the
floor or ceiling. At the floor, you could nail a thin strip
of
drywall to the studs so that accidental kicks won't crush the wall here
or leave a hole. Or better yet, something like Celotex (the
black
fiberboard you see on houses as they're constructed) cut into
strips. Remember to caulk the small gap between the floor and
the
bottom of the drywall. I'm not sure about the best way to
attach
baseboards - perhaps with glue, or else don't nail it too
often.
Or perhaps you could use vinyl cove base. Leave about a 1/4"
gap
at intersecting walls, and caulk it. I'm sure drywall mud and
tape is fine, but better safe than sorry. Then tape and mud
it as
normal. Perhaps do the same thing at the ceiling/wall
juncture. Seal the gap between the floor and bottom
of the drywall with flexible caulking. When finished, the
walls
should flex slightly when pushed.
Resilient
channel can also be applied to ceilings. Make sure all
flanges
point in the same direction. Personally, I have my
home theater area directly below my bedroom. I had planned on
using
insulation and 1/4" drywall on the ceiling, and then adding resilient
channel,
and then hanging 1/2" drywall off the resilient channel. But
as I
found out, I may want to use resilient channel directly on the joists,
with maybe 5/8" drywall (maybe even double 5/8", 1/2" or 3/8" drywall
layers). Apparently the most likely reason you don't want to
add
resilient channel on top of drywall is because the screws holding the
new drywall will touch the underlying layer and transmit vibration to
it.
Wall
Configurations
STCs of various types of walls:
| Technique |
STC |
| Caulking | 5 |
| Insulation | 3-4* |
| Double
Drywall |
2-3 |
| Metal
Studs |
10-13 |
| Resilient Channel | 7-13 |
| Staggered Studs | 12-13 |
| Two Walls | 20-22 |
Acoustical Sound Transmission
Construction Tips
To stop airborne acoustical transmission, picture the room as
a
giant "fish tank" and that you are attempting to seal all
leaks.
Doors, windows, outlets and vents are prime suspects. Use
caulking
to seal around electrical outlets and switches. Also seal the
openings where the wires come in. Turn off the breaker to
those
outlets and switches while you seal them. Another thing to be
careful of is to not let outlets on opposite sides of the wall share
the same wall cavity space. And seal the holes in the studs
where
the wire passes from one box to another (or any other holes in the
studs)! Note that this primarily applies to "single" walls
with
drywall mounted directly to the studs. If you are using
resilient
channel, staggered studs or double walls, you already have large gaps.
:-) Use heavy, solid core
wood
doors. Remember, mass is a way to fight sound
transmission.
Use weather-stripping around the edges of the door, and a sweep seal
underneath though HVAC concerns will need to be addressed.
Better
yet, buy a door system designed to prevent sound
transmission. It
will be built similar to an exterior door with a threshold
seal.
Heck, an exterior type door would probably work assuming it is solid
core. Remember, an air
return in the room is essential if you totally seal it.
Insulation in the walls will also help, though not nearly as much as
resilient channel or staggered stud construction. Insulation
adds
about 3 to 6 dB. Note that "special acoustic fiberglass"
insulation may not be much better than plain old pink
Owens-Corning. Multiple glazed
windows will help with sound intrusion from outside the home.
Make sure the glass panes are as far apart as possible.
IMPORTANT!!! Noise leaks through the weakest links in walls - through (or around gaps in) a door or outlet. Don't spend money or effort improving walls until all these weak links are controlled!!! Other tips:
Heating and cooling ducts present there own
problems. If you
totally seal a room, there has to be a way to circulate air.
Therefore the room needs its own air return. Better yet, use
a
totally separate heating/cooling system to the home theater room
:-) Metal ductwork is notorious for transmitting
sound. If
possible, use flexible ducts. You may want to keep the
soundproofed room on its own trunk lines as other rooms branched off of
the same trunk line may transmit sound to or from the sound controlled
room. Or at least only attach rooms on the same trunk line
that
are not critical to the sound controlled room. If privacy is
the
issue with the sound controlled room, only attach rooms on the same
trunk line that are not "public" where other workers or the public
might hear. If it is a home theater and you wish to keep loud
movie sound out of the rest of the house, don't share lines with
bedrooms as it will interfere with sleeping. As with
electrical
outlets, be
aware that ductwork for adjacent rooms don't share the same wall
space. Air returns for adjacent rooms sharing the same wall
cavity allow direct transfer of sound. There are so-called
"duct
mufflers" to trap sound from traveling through ducts, but they are
rather expensive. They appear to be roughly 2' or 3'
insulated
"boxes" that install somewhere along the room's air duct in order to
trap sound similar to a muffler on a car.
Last Updated 08/20/11