home
restaurants
why they rise
starting out
equipment
basic recipe
tips & tricks
step by step
recipe links
history
copyright
information
Popover Tips & Tricks |
break out
of frames |
Tip #1:
- Flour: use all-purpose flour, not bread or cake flour. Unbleached flour is better than bleached flour. Spoon the flour into the cup and level it off with a knife. Do not shake the cup to settle the flour.
Tip #2:
- Eggs: be sure that your eggs are the size called for in the recipe. Too much egg yolk can keep the popovers from rising. For best results, measure your eggs: one large egg is equal to 1/4 cup. If you use egg substitutes in popovers, they will lose their puff.
Tip #3:
- Milk: when I've used skim or low-fat milk, the popovers tend to burn. So I turn down the oven 25 degrees and take at least a couple minutes off the time. We prefer the taste of popovers made with skim milk, but the bottoms of the popovers end up somewhat shrunken and funny-looking.
Tip #4:
- The popovers rise better if the batter is at room temperature. I warm the milk and eggs in the microwave or on the stove for a few seconds before adding them to the dry ingredients.
Tip #5:
- In general, mix the wet and dry ingredients separately. Gently whisk the eggs until they are thoroughly mixed and change color. Add the milk and other wet ingredients. Then gently whisk the wet ingredients into the dry ingredients. Only mix the batter until small lumps are left in it, to reduce the risk of overmixing the batter.
Tip #6:
- Move the oven rack to a lower (but not necessarily the lowest) slot to keep the tops from overbrowning.
Tip #7:
- Preheat the oven until the oven thermometer says it is the right temperature. Preheat the popover pan on top of a baking sheet in the oven until hot. The baking sheet boosts the bottom heat, which helps the popovers rise. (If your recipe calls for a cold oven start, ignore this tip.)
Tip #8:
- Brush the popover pan with melted butter or oil (preferably canola). I love those nonstick sprays, but I've noticed that the popovers are more likely to collapse if I use them. Either the sides don't get firm enough to hold the popover's shape or they stick to the pan.
Tip #9:
- Pour the batter into the popover pan from a lipped pitcher or bowl. The pan is out of the oven only a short time, so it stays hot. Also, you avoid stirring the batter more. Fill the cups 1/2 full. Do not overfill the cups.
Tip #10:
- If you leave one of the cups of the popover pan empty, fill it half full of water. This will help protect the pan from the high heat.
Tip #11:
- DON'T PEEK! Remember, popovers are leavened by steam. Heat is required for the rising of the popovers. If you open the oven door, the heat escapes, the oven cools down, the steam inside the popovers condenses, and the popovers collapse. So, don't peek for at least the first half hour of baking.
Tip #12:
- Leave the popovers in the oven until the sides are firm and crusty. If they are taken out of the oven too soon, the popovers collapse and lose their magnificent puffs.
Tip #13:
- If you leave the popovers sitting in the pan after removing them from the oven, they tend to get soggy. One way to prevent sogginess is to slit the popovers with a knife five minutes before the end of baking to release the steam. Be careful! The popovers are extremely hot fresh out of the oven, due to the steam.
Tip #14:
- To store leftovers, wait until they cool completely to put into a food storage bag. If you seal them into a bag while they are hot, the steam condenses inside the bag, turns to water, and makes the popovers mushy.
Tip #15:
- Remember to top your popovers with all the goodies: jam, butter, maple syrup, peanut butter, or honey. Some people open the popover and put in fillings: fruit, vegetables, meat or cheese.
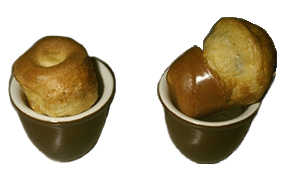
These popovers are glassy. The crust will be tough due to being overcooked.
This photo compares a perfect popover with a collapsed popover.
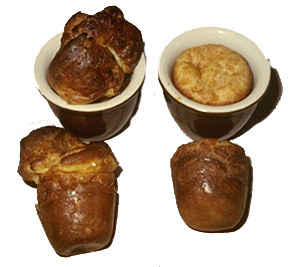
Don't lose hope if some of your popovers look like these. They may not be perfect, but they still taste wonderful. A popover has never gone to waste at our house.
These "Tips & Tricks" are a lot to remember! Click here for step by step instructions, the long version of the "Basic Recipe".
Little agreement exists among cooks on how to bake popovers: always use a cold oven start or always preheat the oven; mix the batter in a blender until smooth vs. don't mix the batter any more than is necessary; don't grease the pan at all varies to grease the pan well. These are just a few of the differences. The above "Tips and Tricks" are the methods that have worked the best in my own kitchen. Folks have e-mailed me with popover success stories achieved by following the "Tips & Tricks".
However, feel free to experiment with the ingredients, methods, and cooking times and temperatures to develop the best popover recipe for your kitchen. A suggestion for beginning experimenters: follow a specified method or recipe precisely. The next time you bake popovers, change one item and notice the effect (if any) on the popover's taste and appearance.
What can you vary? Try 1 egg instead of 2 in the basic recipe, canola oil instead of butter, or cold oven start versus preheated oven (cooking time remains the same). Try different cooking containers, add baking powder, fill the tins 2/3 to almost all the way full, or slit the popovers with a knife five minutes prior to the end of the cooking time. The list is virtually endless. When you get a popover that tastes so delicious that you are unwilling to change it anymore, you've got a good recipe.
Here is an article that describes one restaurant's struggle to develop a recipe: Good science makes good popovers.
Alternatively, click here to pick out a recipe from the recipe links. Popover recipes vary broadly in the ingredients, methods, and type.
return to top