Clutch Pedal Bracket and Master Cylinder Replacement
This is one of those “inevitables”. It WILL happen to you sooner or later if you own an E28. It may have already started and you aren’t aware of it yet. The usual symptoms are that the clutch pedal doesn’t return all the way after being depressed. If you lift it with your toe, it will pop up. Eventually you may start hearing a cracking or popping noise. Similar symptoms can be caused by a failed master cylinder (MC), slave cylinder, or air in your lines. But in these cases the pedal usually stays on the floor and if you pull it up it is floppy, there is little or no back force. Sometimes pumping it will get it back to normal temporarily. It is also possible that your return spring is off of its perch or broken.
You need to remove the lower dash trim panel and look up there with a flashlight. Move the clutch pedal with your hand. Does the spring appear to be working – does it pivot on its mount? Is there brake fluid leaking from the MC? That would clearly indicate a trashed MC, but they also fail without leaking. And even if it is trashed, it may be because your bracket is cracked. This is because the cracked bracket will flex under load which gets the MC misaligned and caused the piston to bind inside the cylinder. Carefully look at the black bracket where it bends above the MC (see pics below), pump the pedal, and watch for movement. You may have a big crack but it can be tough to see unless you get it to open up.
So you found the crack? Fun time!! The bracket is about a $40 part, and you should do the MC as well unless it has just been replaced. It will fail soon and you may as well do it while under there. Some folks have their bracket welded and reinforced, or get a new one and reinforce it. Some have even had it welded while still in the car. You CAN just do the bracket with the MC in place if you think it is in good shape, but driving with a cracked bracket will greatly shorten (or end) the MC’s life. You may also want to do the slave, but I didn’t (it was fairly new). If your return spring is trashed you will also need that, I didn’t.
Stuff You Need:
So you need the bracket, the MC, some brake fluid, the plastic nipple which connects the MC to the feed hose (easy to break the old one), and while you’re at it a couple feet of the blue rubber brake fluid feed hose. Tools include a turkey baster or syringe to drain brake fluid, a pump oil can and a couple feet of 3/16” ID vinyl hose for bleeding the MC (see bleeding section blow), some grease, and every metric wrench you can locate w/in a 10-mile radius. The more types/sizes/lengths of wrenches, handles, sockets and extensions etc you have, the easier the job will be. It is tight under there. Specifically, there are a lot of 13mm and 17mm nuts, with some 15mm and 19mm too, not to mention 10mm. A deep 10 mm socket and small ratchet handle will help get the MC bolt closest to the firewall. I also had a set of those box-end self-ratcheting wrenches, not necessary but useful. You will also need an 11mm wrench for the MC output fitting. You should have a wrench made for hydraulic fittings (i.e., closed on 5 sides) or you may strip it. It should be small, no more than 6” long or so or it won’t fit in there easily. You may be ok using a standard 11mm wrench but be careful. You also need a standard 7mm wrench for the slave bleeder nipple. I also got some oil-dry pads from Wally World to catch any dripping fluid.
Give yourself a good long afternoon to do this job. Mechanics will charge around 5 hours for the bracket alone, plus more for the MC.

How to Do it:
I am assuming you are replacing the MC, if not, just unbolt it from the bracket (2x10mm) and clutch pedal and push it out of the way as much as possible. KEEP TRACK OF YOUR BOLTS etc. as you remove them - label them if you have to
1: Put the car up on ramps or the front end on stands.
2: drain brake fluid from reservoir with baster.
3: Attach vinyl hose to slave nipple, loosen nipple, and pump clutch a few times to pump fluid out of MC. Close nipple.
4: Move you seat all the way back and get under the dash. A nice cushion for your knees helps. Look at how everything is in there. Take pictures maybe. It is easy to put stuff back the wrong way, especially the steering column brackets (the gold arms hanging down). Note that both of the fork arms are attached to the right side of the gold arms (i.e., not centered). Put something (oil-dry) on your floor in case you drip fluid. Unplug pedal switch wires and steering column harness.
5: Unhook the pedal springs from pedals (leave other ends attached to pedal bracket, and remove whatever you have to to get the clutch and brake pedal out. See diagram, but it is pretty obvious. At some point the big return spring just falls out as the firewall end has two knife-edge pivots that fit into a groove in the pedal bracket. It is just held in there by tension. You also need to remove the gold bracket with the switch on it.
6: You should be able to remove both pedals, the spring, and associated hardware. Now you need to detach the output end of the MC from the pressure hose. It sticks through the firewall into the engine compartment, so you have to stand by the driver’s fender and feel for it under the brake MC against the firewall – you will be doing this part totally blind. You can see it using a mirror and flashlight, but not when your hands are in there. I stuffed an oil-dry pad down there to catch any paint-eating brake fluid that leaks out. Get your 11mm wrench in there and loosen the nut (it stays attached to the hose) then remove nut from MC by hand. Get back under the dash and unbolt the MC from pedal bracket. Detach the MC feeder hose from the side of the brake fluid reservoir (careful don’t break the nipple) and pull the hose through the firewall from inside the car as you remove the MC.
7: There are 4 nuts that attach the pedal bracket (PB) to the firewall, and 4 that attach it to the dash. Plus there is one sneaky one above the steering shaft. Remove all of these and the also the two bolts that attach the gold arms to the steering fork. Finally remove the two bolts that hold the steering column to the dash. The steering column will now drop down so be careful. You can either rest the wheel on your driver’s seat, or try releasing the telescoping clamp and pull the column completely out of the car. I left mine in, it wouldn’t come out.
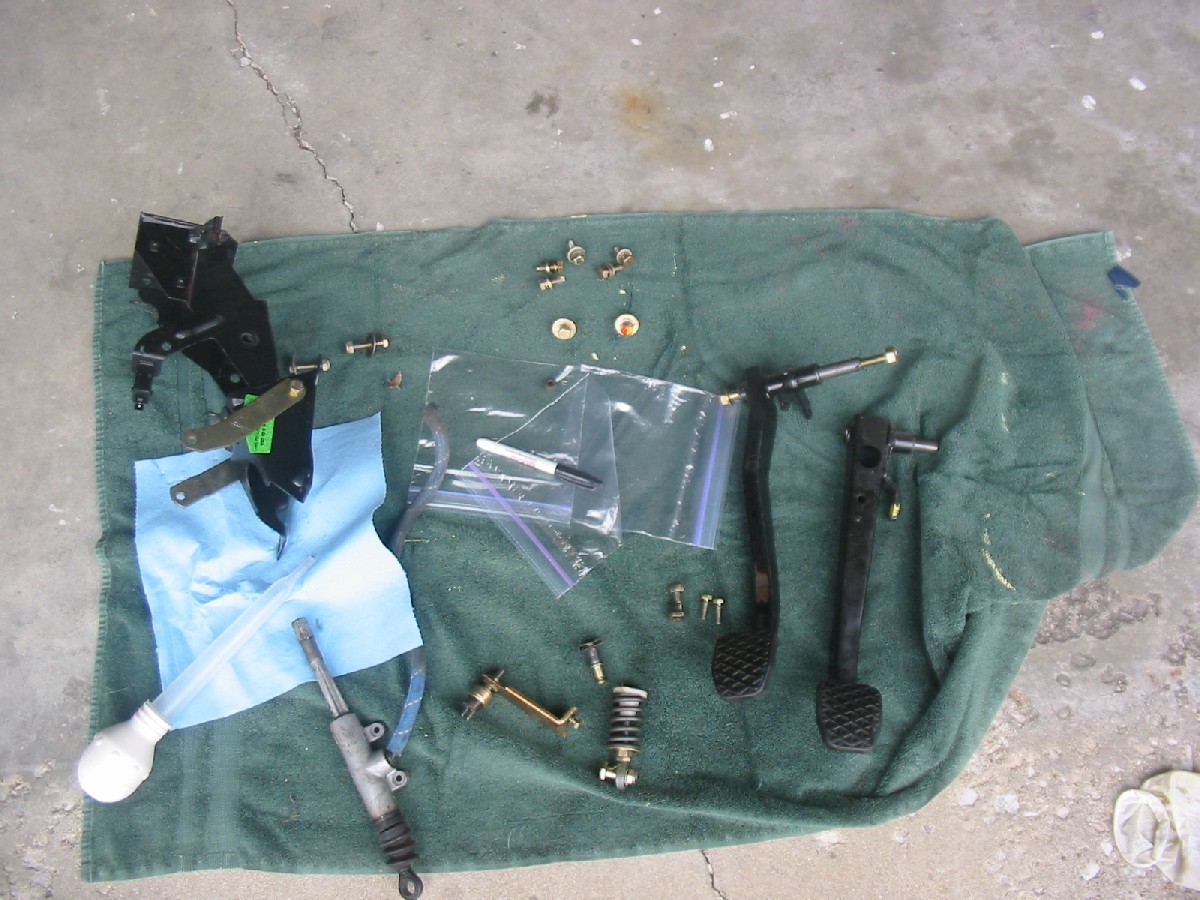
8: With the column dropped/removed and all mounting bolts removed you can now maneuver the PB out. See pic of all parts removed from car. You will need to swap the pedal springs and their rubber grommets, a plastic bushing, and those gold arms to your new PB. CAREFUL – pay attention to how those gold arms are mounted to the PB – very easy to mount them backwards, inside out, upside down etc.
9: Maneuver the new PB into the car and attach mounting bolts loosely. You basically want to reverse what you did before.
10: Put a new nipple and blue hose on your new MC, and feed hose and output end through firewall. Attach hose to brake reservoir nipple.
11: Reattaching the pressure hose to the MC can be a big PITA! I had no problem though – took a few minutes. The secret was to NOT mount the MC to the bracket yet, leave it free to move, and have a helper under the dash. Feel around until you find the end of the MC and the pressure hose fitting, and try to thread the nut by hand (remember you are blind here). Instruct your helper to move the MC until you can line it up properly. Thread it all the way in by hand, then snug it with your 11mm wrench. That’s it.
12: Tighten up the PB mounting screws, reattach the steering column, and bolt the MC to the PB. Remount the pedals. Grease pedal pivot areas during assembly, including the slot in the PB where the return spring pivots. Reattach pedal springs, switches, harnesses, etc. Attach the MC to the clutch pedal and the return spring to the clutch pedal. Set the knife-edges into the PB groove and check that this is still in place before finishing up.
13: Bleeding the MC: This can also be a PITA but again it is simple if you know how. Fill the brake reservoir with fluid. Open the bleeder screw and pump the clutch pedal until brake fluid comes out of the vinyl hose attached to the bleeder. Now, fill your new clean pump oil can with brake fluid and attach it to the bleeder hose. Pump it several times to force brake fluid back up into the system and force any air out into the reservoir (reservoir cap should be off ) – make sure it doesn’t overflow. If your clutch pedal feels good and you can hear the slave working, you’re done.
14: Give it a drive before reattaching dash trim panel. If all is well, finish up and have a beer.