Introduction
It is almost impossible to think about astronomy
without envisioning telescopes. They are as much a symbol of the discipline as a
hammer is to carpentry or a gradebook is to teaching. But this fascination has a
price. Even a small telescope can have large price tag. Yet telescopes are not
especially complicated devices. This reasoning has led many to try making their
own telescopes. A great deal of skill, thought and craftsmanship go into these
creations. The results often surpass the quality of commercial telescopes. But
one look at these telescopes is enough to convince most people that telescope
making is beyond the skills and tools of the average stargazer. But making a
small telescope need not tax ones skill, toolbox or budget.
This booklet
will show how to put together an excellent small telescope without having a
fully equipped woodshop and metalworking facilities. Instead of a concave mirror
these telescopes use lenses, some of them surplus, available by mail order. This
makes the telescopes refractors instead of the reflectors often made by
amateurs. Refractors are rugged, require little if any upkeep and are easy to
setup and transport. The mechanical parts and mountings will be made from
assorted pieces of hardware and plastic pipe. Only common hand tools are needed
(of course power tools are always welcome). The results can rival equipment
costing hundreds of dollars.
This booklet has plans for two different
telescopes. One is a 61.7 mm diameter refractor with a focal length of 700 mm.
The second design is identical except for having a focal length of 415 mm. Both
of these telescopes can be used on any of three mounts. The first is a rugged 4
ft. tall "pier" mounting. The second is a portable "bucketscope" mount. The
third is a compact version of the "pier" called the "short pier"
mount
HOW A TELESCOPE WORKS
Anyone who has shopped for a telescope in a department store knows that magnification is the great selling point of some telescope makers. But telescopes are designed to accomplish three goals, the least important being magnification. In fact the "power" of a telescope comes from it's eyepiece. By changing eyepieces an observer can get a wide range of magnifications from almost any telescope. The real test of a telescope is how well it shows detail, known as resolution, and how much light it collects.
Objective Lens
The key to resolution and light gathering ability is
the objective lens. This is the large lens in the front of a refracting
telescope or pair of binoculars. It's purpose is to collect light from whatever
it is aimed at and focus that light to form an image. While this image is small
it is much brighter than an image made by your eye. This is because the
objective has a diameter or aperture much greater than the eye. This
allows a telescope to collect more light than can enter your eye.
Aperture
also gives a telescope it's resolution. This explains why a telescope is
referred to by the diameter of the objective. Telescopes are usually compared by
aperture. When an astronomer speaks about a "80 millimeter" refractor or a "6
inch " telescope she is speaking about aperture. Both telescopes illustrated in
this booklet have an aperture of 61.7 mm.
Eyepieces
The eyepiece, or ocular, is simply a magnifier. In
fact an ordinary pocket magnifier can do a creditable job as an eyepiece. While
magnifiers usually magnify real objects, in a telescope they magnify the image
made by the objective. Magnifying brings out the detail in an image. Different
eyepieces increase or decrease magnification.
While it is possible to
magnify the image in the smallest telescope by huge factors the more an image is
magnified the dimmer the image gets. Making the image twice as large makes it
four times dimmer. Magnifying the image also magnifies the effects of air
turbulence, the shaking of the mount and any slight flaws in the objective.
Telescope users try to magnify an image only as much as needed to bring out all
the detail in an image.
Operation of a Telescope
A completed telescope pairs an objective
and an eyepiece. The tube merely holds the pieces in place. The tube needs to be
long enough so that the eyepiece is just behind the location of the image made
by the objective. For distant objects the image is at the objectives focal
point. As you try to focus on nearby objects the eyepiece will need to be pulled
further away. The position of the eyepiece also needs adjusting when switching
from one eyepiece to another. For this reason most telescopes have some means to
adjust or focus the eyepiece.
The magnification of a telescope is found by
dividing the focal length of the objective by the focal length of the eyepiece.
Magnification=f(objective)/f(eyepiece). It is easy to see that the objective
needs a long focal length while the eyepiece needs a short focal length. The
telescopes in this booklet have a focal length of 700 or 415 mm.
Objectives and Eyepieces
Objectives
The objectives for both of the telescope plans come from:
Sky Instruments
MPO Box 3164
Vancouver B.C. Canada V6B 3Y6
604-270-2813
1-800-648-4188
Call Glen Speers at Sky Instruments for current prices. Depending on which telescope you wish to make you will be ordering a 61.7 mm diameter commercial grade objective with a focal length of 415 or 700 mm. The cost per objective varies from $24.00 to $17.10 depending on quantity.
Eyepieces
The telescopes described here work best with eyepieces having focal lengths between 12 and 24 mm. The longer focal lengths give better field of view and image brightness while the short focal lengths provide higher magnifications.
The simplest way to acquire eyepieces is to purchase them commercially. Both designs in this booklet accept any standard 1.25 in eyepiece. Sky Instruments offers Kellner eyepieces for $26.00 or less depending on the order size. Magazines such as Astronomy or Sky and Telescope have ads from many other manufacturers and dealers. Major manufacturers include Celestron, Orion, Meade, Televue and others. Prices will range from about $30.00 to nearly $100.00 Any 1.25 in eyepiece will work well. Focal lengths between 10 mm and 25 mm are best.
Making Your Own Eyepiece
Making your own eyepieces is easy and much less expensive. Surplus microfilm or small projection lenses, available by mail order from several surplus dealers, can be turned into useable eyepieces. Look for one with a suitable focal length for an eyepiece and having a diameter of no more than about 25 mm. The cost is ranges between 5 to 8 dollars. Since surplus parts go in and out of stock constantly it is hard to give specific examples to order. Finding the right lens is a matter of hunting through catalogs. If you do not find what you want in a catalog be sure to call the dealers. They often have surplus optics not mentioned in their catalogs. I have had good experiences with two surplus companies.
American Science and Surplus
3605 Howard St.
Squeak, Illinois 60076
847-982-0870
Fax 800-934-0722and
C and H Sales Inc.
P.O. Box 5356
Pasadena CA. 91117-9988
1-800-325-9465
Fax 818-796-4875
Even better eyepieces can be made from binocular eyepieces, microscope objectives and other mounted lens sets available from Sky Instruments. Their prices are very competitive and the end product is usually much better then ordinary surplus microfilm lens. Call them for product availability and pricing.
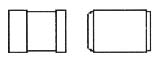
Fig. 1: Typical microfilm and projection lenses
Part List: Homemade Eyepiece
1- Eyepiece Lens
1- 3/4 in. Pull Through "Tee" (A plastic fitting used with electrical conduit)
1-"First Surface" mirror ( can be ordered from most science supply catalogs or American Science and Surplus as order number 2726 three pack for $2.75- enough for 6 telescopes. A second American Science mirror is order number 4112)
Epoxy Glue and Electrical Tape
Black marker
35 mm Film Container
Begin by cutting the bottom out of a gray 35 mm film container. These
containers have the same 1.25 in diameter as regular astronomical eyepieces.
Epoxy the container by its top to one side of the "tee". After the epoxy sets
tightly wrap the joint with a single turn of electrical tape.
Next remove the
"tees" backplate and use a marker to blacken the interior. This will stop any
internal reflections. Then use a glass cutter to cut a piece of first surface
mirror large enough to cover the open back. Be sure to use a first surface
mirror. Regular mirrors, which have their aluminum coating on the back of the
glass, will cause ghost images and blurring. Use the backplate and screws to
attach the first surface mirror to the "tee". Be sure the "first" mirrored
surface faces the interior.
The last step is to wrap a few turns of
electrical tape around the eyepiece and friction fit it into the "tees" second
opening. The eyepiece should have a snug fit that that does not allow the lens
to actually touch the mirror . The finished eyepiece can now be inserted into a
telescope.
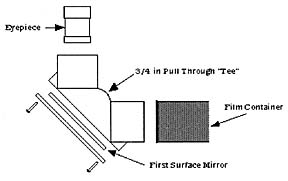
Fig. 2: Making a Diagonal
A variation of this design will work with 1.25 in eyepieces. Instead of a 3/4 in pull through "Tee" use a 1 in. PVC Schedule 40 "Tee". Cut the "Tee" at a 45 degree angle .
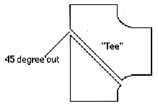
Fig. 3: Cutting a PVC "Tee"
Attach a first surface mirror and open bottomed film container as in the previous design. The Film Container will actually slide into the "Tee" for a short distance. Make sure to insert the container before gluing.
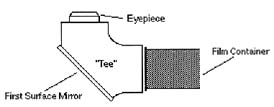
Fig. 4: View of PVC "Tee"
Finish the "Tee" by adding a few shims of adhesive felt around the eyepiece side of the "Tee" to hold the eyepiece by friction
Telescope Designs
PVC pipe is the key to building a simple telescope. This hardware store staple is cheap, easy to cut, durable and comes in different diameters. A wide range of fixtures is also available. All PVC parts and fittings used here are schedule 40 PVC. Be sure to ask for it by name.
PVC Telescope-700 mm version
This is an ideal telescope for those wanting good views of the Moon, Jupiter and Saturn. It uses the Sky Instruments 61.7 mm diameter/700 mm focal length objective mentioned in the section on objectives.
Parts List: 61.7 mm dia. 700 mm Fl Telescope
1-21 in. section of 2 in. PVC ( body)
1-2 in. section of 2 in. PVC ( dew cap)
1-8 to 10 in. section of 1.5 in. PVC ( focuser)
1- 1.5 in. to 1.25 in reducer (commonly known as a female compression fitting)
2- 1/4 in carriage bolts (1.5 in long) with washer and wingnut for each
1- piece of 3/4 in PVC pipe ( about 14 in long)
Black Electrical Tape
Flat Black Spray Paint
1- Piece of self adhesive Felt
1- 9 in by 2 in piece of thin cardboard or plastic stock (card stock or thinner - soda bottle plastic works great)
Construction of this telescope begins with painting the interior of both the
2 in PVC pipe and the 1.5 in pipe with black spray paint. After the paint has
dried a pair of 1/4 in holes should be drilled through the middle of the 2 in
pipe. These holes will be used to mount the telescope.
Each hole must have a
carriage bolt inserted from the inside of the pipe. The pipe is too narrow to do
this by hand. The 3/4 in pipe can be notched at one end to make a "widget" that
allows carriage bolts to be inserted from the inside out.
![]()
Fig. 5: A "Widget"
Once each bolt is placed it should have a washer and carriage bolt attached and screwed in tight. This tightening allows the bolt to dig into the inner wall of the pipe. Afterwards the wingnuts can be loosened. Be sure to never remove the wingnuts as that will allow the bolts to fall out.
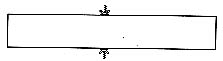
Fig. 6: Telescope Tube after Carriage Bolts Have been Placed
The next step is to attach the objective lens to the telescope tube.
WARNING!!!
Special care must be taken with the objective lens. It is airspaced and
unmounted. In common terms this means the two elements, convex and concave, are
not attached. They are separated by a thin plastic ring. Be careful not to lose
the ring or drop either lens of the pair. A loose set such as this needs a
special method of mounting.
Take one end of the pipe and carefully wrap electrical tape around one lip to
make a bushing with the same outside diameter as the objective. The bushing
should be flush with the lip of the PVC. Make a similar bushing for the dew
cap.
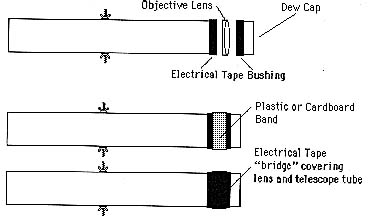
Fig. 7: Mounting the objective
Assemble the telescope tube, objective and dew cap as one unit (make sure the
objectives convex element is facing the dewcap). Then tightly wrap a 9 in piece
of thin cardboard or plastic around the entire tube-objective-dewcap assembly
and hold it in place with a piece of tape. This "band" will keep the objective
from shifting relative to the telescope tube. The last step is to tightly wrap
electrical tape around the entire assembly. The tape will securely hold the
objective to the telescope and the dew cap to the objective. Stretching the tape
will help it adhere better. A single thickness wrap of tape is enough.
Next
place the trap adapter securely on the piece of 1.5 in pipe. If the fitting
feels lose you can glue it with PVC cement. The eyepiece will fit into the
compression fitting. The 1.5 in. pipe will be placed into the rear of the
telescope and used as a focuser. Unfortunately the 1.5 in pipe is too thin for a
good fit. A sheet of felt with an adhesive back is used to get the proper
fit.
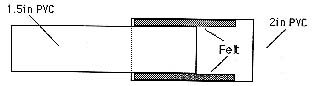
Fig. 8: Giving the Drawtube a Good Fit
Once the objective is installed cut the adhesive felt into strips about 1 in. wide and 3 to 4 in long. Use these strips to line the end of the 2 in PVC pipe. The felt may need to be two layers deep in places before it will securely hold the focuser. The grip should be firm but allow the telescope to be focused.
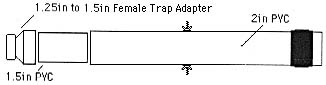
Fig. 9:Exploded View of the PVC Telescope
The 1.5 in pipe acts as a drawtube to focus the telescope. The telescope should focus with no more than about one half of the drawtube exposed.
PVC Telescope-415 mm version
While the 700 mm PVC telescope offers excellent performance and is very portable and compact it is over two feet long. An even more portable telescope can be made using a 415 mm. focal length lens instead of a 700 mm. objective. This compact version can store inside of all three different mounts. It is constructed in exactly the same manner as its longer brother using resized parts.
Parts List: 61.7 mm dia. 415 mm Fl Telescope
1-10 in. section of 2 in. PVC ( body)
1-2 in. section of 2 in. PVC ( dew cap)
1-5 in. section of 1.5 in. PVC ( focuser)
1- 1.5 in. to 1.25 in reducer (commonly known as a female compression fitting)
2- 1/4 in carriage bolts (1.5 in long) with washer and wingnut for each
1- piece of 3/4 in PVC pipe ( about 14 in long)
Black Electrical Tape
Black Spray Paint
1- Piece of self adhesive Felt
1- 9 in by 2 in piece of thin cardboard or plastic stock (card stock or thinner)
Assembly of this telescope is exactly the same as its longer sibling. This short telescope will yield less magnification with a given eyepiece than the 700 mm. telescope but will have a larger field of view and is very stable. It is a good choice for looking at comets and deep space objects such as nebulae and galaxies.
Construction Note
Both versions of the telescope work best with a diagonal. The diagonal is the piece that turns the eyepiece 90 degrees. Without a diagonal the drawtube must be pulled further back to achieve proper focus. If you plan to use your telescope without a diagonal I suggest increasing the length of the overall telescope by 1 to 3 in.
Telescope mountings
Both telescope designs need a mount for the telescope tube. All three
mountings included in this booklet need a "cradle" to hold the telescope. This
cradle is called a fork arm. It is made from 1 by 2 in wood and four dry wall
screws. One way to get the proper width wood is to cut a piece of 1 in. by 10
in. wood into four strips. Wood wider than 2 in. is acceptable.
Cut two
identical side pieces for the fork arms (Fig. 9). Each side piece should have
notches to hold the telescope. I usually cut fork arms 6 in long. They can be
cut longer if desired.
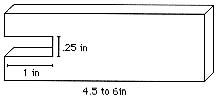
Fig. 10: Fork Arm Side Pieces
The base of the fork is a third block as long as your telescope tube is wide plus an extra 1.5 in to handle the sides to the fork. This usually works out to be 3 7/8 in. This allows the telescope to fit snugly between the arms. BE SURE TO CHECK THIS MEASUREMENT! The piece should also have a 1/4 in. hole drilled through the center. This will allow the fork to be attached to a mount. The pieces are then glued together and allowed to dry. Afterwards drill 4 small pilot holes for drywall screws ( 1.5 to 2 in work very well) as illustrated (Fig. 11).
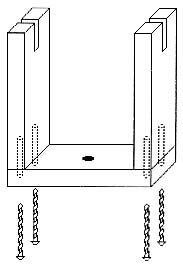
Fig. 11: Assembling the fork
These holes should have a slightly smaller diameter than the screws being
used to prevent the wood from splitting. If dry wall screws are unavailable
finishing nails make a good substitute. Be sure to use very small diameter pilot
holes for nails!
The space between the arms should be just wide enough for the width of the
telescope tube. Be sure to double check all measurements to ensure a snug fit.
The completed fork can be used with any mount in this booklet.
The pier mount, short pier and the bucket mount are all topped by caps having a 1/4 in. hole. A 1/4 in carriage bolt inserted up through this hole provides a mounting point. The fork is attached to the bolt and held in place by a wingnut and washer ( Fig. 12). The space between the fork arm and the cap has a second washer to allow the fork to turn freely without any wobbles. This washer is made from a 35 mm film container with a hole cut in its center. Once the carriage bolt and wingnut are in place tighten the entire assembly. For an even stronger mount use 1/2 in carriage bolts instead of 1/4 in.

Fig. 12: Fork mount carriage bolt base
MOUNTINGS FOR TELESCOPES
Bucket Mount
The bucket mount is a simple and very portable mounting. It will work with both telescope types described in this booklet but is really meant for the 415 mm telescope. All parts of the mount store inside the bucket ( including the telescope if you are using the 415 mm version).
Parts List: Bucket Mount
1-5 gallon "pickle bucket"
1-10 in. piece of 1.5 in. PVC
1-10 in. section of 2 in. PVC
1-11 in. section of 3 in. PVC
1-1.5 in. PVC cap
1-2 in. to 1.5 in. PVC reducer
1-3 in. to 2 in. PVC reducer
1- PVC Closet Flange
4- 1/4 in. carriage bolts with washers and wingnuts for each
PVC cement
The first step in making a bucket mount is, of course, to find a bucket. This
should be a 5 gallon heavy gauge bucket with a lid. They are commonly used to
store pickles, icing and other food stuffs. Similar buckets are used for drywall
compound, floor wax and other bulk products. While any of these will do the best
buckets are those that have lids lacking any kind of spout.
Aside from some
1/4 in carriage bolts the rest of the mounting is made from PVC pipe and
fittings. The diagram (Fig. 13) shows the needed parts and how they fit
together.
Each piece of pipe is topped by a fitting glued with PVC cement.
This makes three sections that in turn are held together by friction. The closet
flange is attached to the bucket top by 4 carriage bolts. This will require
cutting or drilling 4 holes in the bucket lid. The wingnuts and washers should
be on the lid's bottom side To store the mount simply pull each section apart.
They will then store inside each other and can be placed into the bucket.
Telescopes are attached to the mount with the fork arm described earlier.
The 1.5 in cap at the top of the mount should have a 1/4 in. hole for attaching
the fork mount (see Fig. 12).
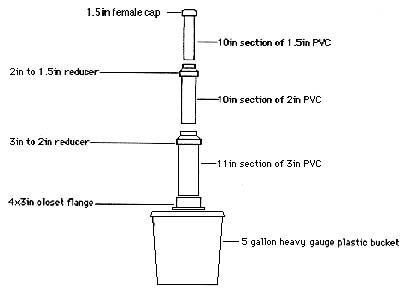
Fig. 13: Bucket Mount plans and parts
Pier Mount
The pier mount is a general purpose mount for both the 700 mm and 415 mm telescopes. It is rigid and has the proper height for standing use. One feature of the pier mount is a storage space for the telescope built into the pier itself.
Parts List: Pier Mount
1- 40 in (3.3 ft) section of 4 in PVC Pipe
1- 4 in Cap
3- 2 in Carriage Bolts with wingnuts and washers
3- 18 in long pieces of wood ( 3 in. wide lengths cut from a 1 by 10 in. board work best)
3- small blocks of wood
6- 3 in Mending Plates
Finishing Nails
Large foam rubber ball or piece of foam rubber
The three 18 in wood pieces make pier legs. The legs are arranged as seen in the figure below. Use the 4 in PVC pier as a form to maintain proper placement (Fig. 14). Each leg is joined to its partners by mending plates. The legs must fit snug against the pier. When all the legs are attached insert the 4 in pipe flush with the bottom of the leg assembly. Then drill three holes through both the legs and the PVC. Carriage bolts inserted through each hole attach the legs to the pier. These carriage bolts can be removed to separate the legs for storage. Finish the legs with small blocks of wood used as "feet". Glue and nails are used to attach a "foot" to the bottom of each leg.
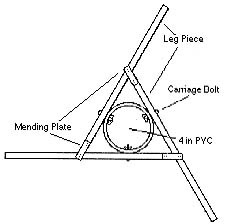
Fig. 14: Pier legs as seen from below
A 4 in. cap is the pier's top. The cap should have a 1/4 in. hole drilled in its top. A 1/4 in. carriage bolt is pushed up into the cap. The fork arm is attached to this and kept in place with a wing nut (see Fig. 12). When the top is completed a large piece of foam rubber is forced down the 4 in PVC. A telescope can be placed inside of the pier for storage by lifting off the 4 in. cap. The foam rubber will keep the telescope from falling through the pier and will also cushion the telescope.
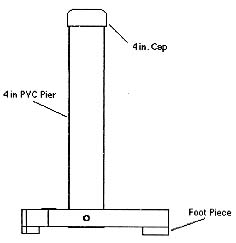
Fig. 15: Completed Pier Mount
Short Pier Mount
The short pier mount is a smaller and more portable variation on the regular pier mount. It is also an extremely easy mount to assemble. It can be used with both 700 mm and 415 mm telescopes. The 415 mm telescope can be stored within the pier.
Parts List: Pier Mount
1- 2 ft section of 4 in PVC Pipe
1- 4 in Cap
1- 4x3 in Closet Flange
Large foam rubber ball or piece of foam rubber
The only difference between the pier and short pier is the leg system. Instead of wooden legs the short pier uses a closet flange as the base. Because of the 2 ft height the short pier needs a table top or other surface to be at viewing height.
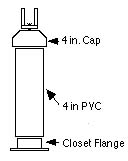
Fig 16: Exploded View of Short Pier Mount
CONCLUSION
Hopefully this booklet will get you started in "bare bones" telescope making. A little willingness to experiment can produce wonderful results. If you find an interesting lens, design a new mount or telescope, need some help or just have some comments please feel free to call or write.
Rico Tyler
Science Education Practitioner in Residence
Western Kentucky University
Dept. Of Middle Grades and Secondary Education/ Physics and Astronomy
1 Big Red Way
Bowling Green Ky. 42101
270-745-6199 (W)
270-586-9518 (H)
Rico.Tyler@wku.edu
RTTYLER@aol.com
I look forward to hearing from you.
NOTICE TO USERS
This booklet is intended for teachers and others interested in astronomy education. I give Permission to duplicate this booklet for nonprofit educational uses by classroom teachers and others doing teacher professional training or public outreach. All copies should be complete and include all information about the author. Give notice to the author of your use of this booklet.