Larin Lifting Jack Adaptors:
I
have a 2000 Spirit and bought the jack from Sam’s club for $100 figuring I
could make it work. Well, after a
few beers and some tinkering I did make the jack work to my satisfaction.
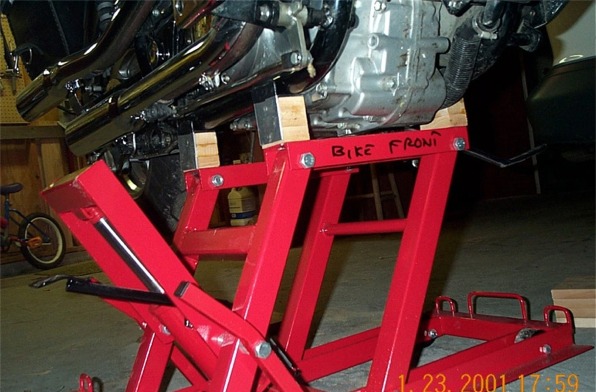
Once I got the bike up on the jack it sat pretty solid provided you
don’t try get on it or let your kids climb all over it!
It does not rock from side to side but, if you’re not changing tires,
with blocking under the wheels will allow you to do most anything you want.
Since the lifting channels are only about 13” apart, it will rock a
little from back to front but not enough to knock the bike off during cleaning
and maintenance. Oil changes will
also be a bit messy since the oil will run all over the jack. However, the
manual recommends changing the oil on the sidestand, anyway. The drain plug is
not situated where you can get a pan under it, so I will do those with the bike
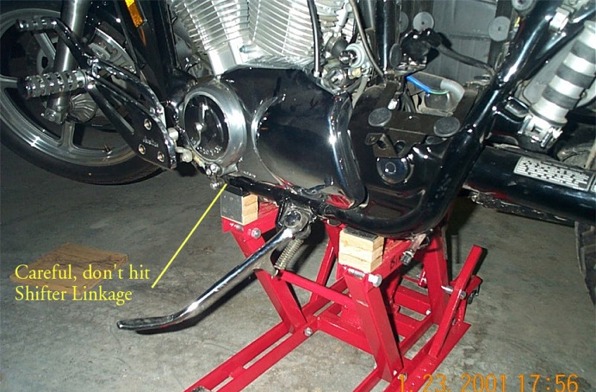
on the side stand. The problem is
that the engine hangs about 2” below the frame pipes (which the jack will lift
on) and to get the jack under the bike you will first have to roll the front and
rear wheel onto a couple of ¾”
boards (I cut a couple of scrap pieces into 12” squares for this) and place a
3” block under the side stand. The
bike will be almost vertical but sits surprisingly steady.
This will provide the clearance to slide the jack under the bike from the
front. I can’t see any jack
fitting under the bike when it is on the floor and side stand, there just
isn’t clearance to fit the jack with the lifting posts under the bike.
Now
to the mods. First thing you need
to do is take off the rubber pads. I
cut them up later to glue onto the blocks to protect the frame.
Also, you have to knock off the round bars at the end of the lifting
channels. I used a cold chisel and
hammer and made short work of it. These
things were not welded on by nuclear power vessel welders so they come off
easy!! Remember, don’t force it,
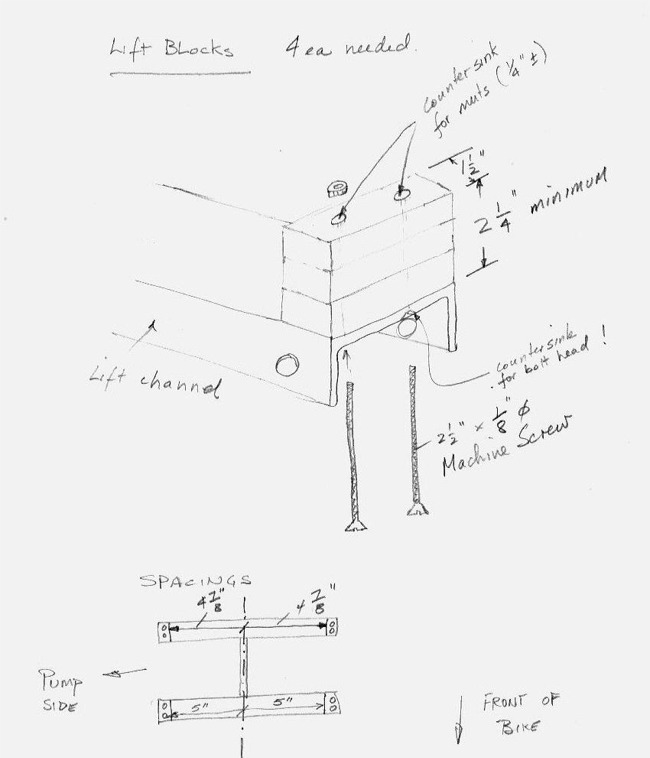
get a bigger hammer. Next I made the lifting blocks to fit on each end of the
channels. (You’ll have to take
off the channel assembly since you will have to drill holes in the ends and
countersink on the underside to fit the bolts.)
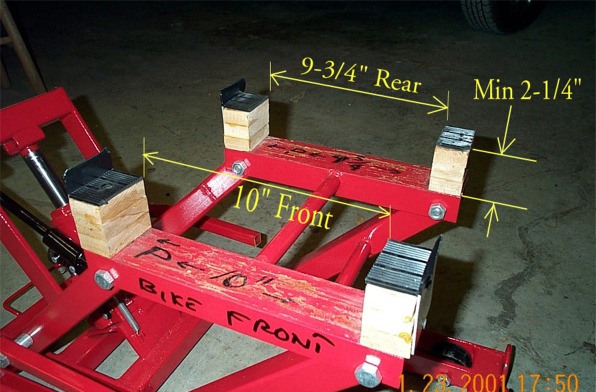
The blocks have to be at least 2-1/4” high so you clear the engine when
lifting. I used three pieces of
scrap hardwood each ¾” thick x 1-1/2” wide x 2-1/2” long and glued them
together to make each block. As a
precaution, I taped the blocks onto the lifting channels in the right position
and manually fitted the assembly under the bike and made final adjustments to
their positions so they would hit the bike frame exactly where they are supposed
to. Critical dimensions are the
blocks have to be minimum 2-1/4” high (plus the rubber pad) and at the front
of the bike must be 10” apart to clear the engine and hose.
At the back I made them 9-3/4” apart.
Measure from center line. C-clamp
the blocks in position and drill two holes for 1/8’ machine bolts (use beveled
head) to hold the block onto the channel. You
must countersink the top of the block for the nut and the underside of the
channel for the head of the bolt. 2-1/2”
bolts fit nicely and you can file off any protrusions.
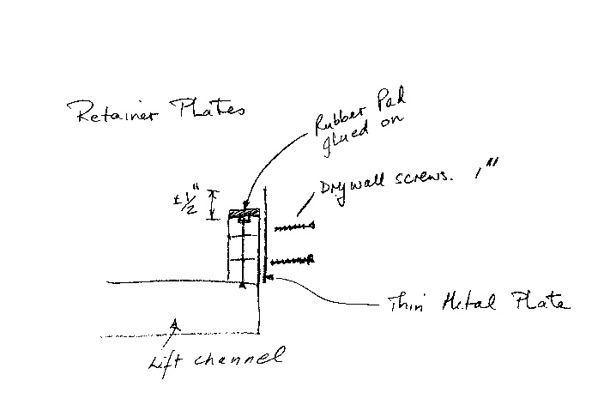
Cut four rubber pads to size and glue to the top of the blocks.
One note, I did not countersink the bolt head enough so I had to grind
off the corner of the 1-1/2” square tube member so it would clear the bolt
heads. For comfort, I screwed a
thin metal plate to the outside of each block, extending about ½” above each
block to align the jack and prevent the bike slipping of the jack sideways.
You’ll have to leave off the one on the block that slides under the
side stand as it won’t clear. You
can make one that can be installed after the jack is in place if you think you
need it. I have made some crude
drawings of the assembly to help clarify the picture.
This is a real jury-rigged setup, but it works and cost me only $1.50 for the bolts. I could have had our machine shop at work make me a fancy metal one, but I wanted to do it with stuff most of us have at home or can pick up in a scrap bin at the local lumber yard.

