|
|
CORUSCANT CUSTOMS
Figure and Diorama by:
Blue Snaggletooth
 |
|
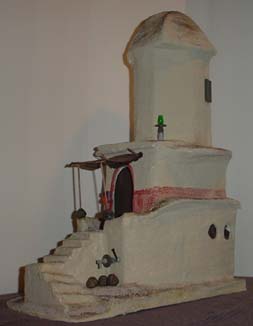
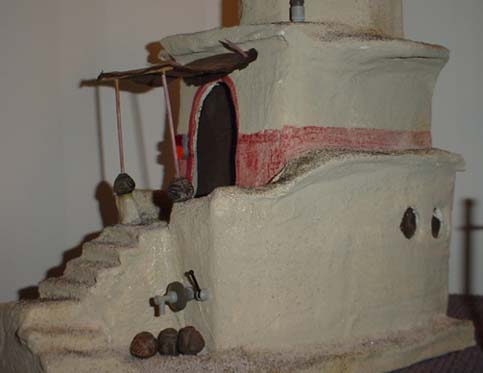
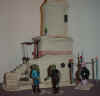
Here
is a picture of the finished building structure. Other than three new
features, this building was made identical to the other two structures
thus far. Once I built up this dwelling to capacity I found that I did
not have enough base board to properly construct a stairwell. So, I
decided to use a cardboard extension to give more volume to the base
on the left side. I also added a canopy over the front porch/balcony.
I used toothpicks, wood glue, paint, beads & a brown velvet patch
to construct the canopy. However the greatest new design technique was
using a template that I laid down on the base board before any of the
building process started. This template laid out the wall design for
the entire structure and allowed me to see the ultimate design in my
head. The template idea worked great!
|
 |
|
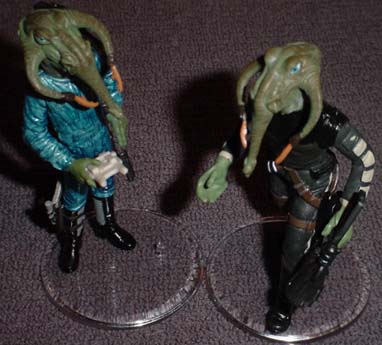
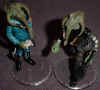
Here
are the two Ketwol pilots/smugglers you saw earlier that were made by
chop/shop techniques. These are the final painted versions. The pilot
on the left has had his entire jumpsuit painted a metallic blue and
the pilot on the right has had several black touch-ups. Each figure
has an accessory or two and they look like they are into something
deep, possibly smuggling illegal spices into the city streets for
Jabba the Hutt. I don’t quite know yet what I want these Ketwols
back story to be, but I can assure you that it is going to be good.
|
 |
|
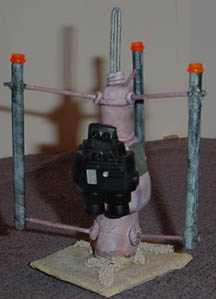
Now
you see the final version of my first successfully replicated moisture
evaporator. After constructing this piece, all that was left to do was
to paint it. I painted it by applying a khaki base coat, and then a
deep brown wash and finally adding several layers of weathering (dry
rubbing) using white paint. The straws and coat hanger where painted
with a chain mail color and highlighted with silver. I used some spare
Lego pieces to add the red lights on top of the straws and the two
vented panel sections located on either side of the front control
panel. I painted the base khaki and applied some loose gravel to add a
slight contrast in texture. I will consider this piece a Mos Espa
common evaporator and make a few more just like it for other areas of
the ultimate diorama.
|
 |
|
Here
is a more detailed picture of the building structure. I am happy with
the way it turned out. This was the most detailed piece thus far. With
the winding stairwell and canopied porch this piece offered some true
challenge. You can see the various spots where I utilized some LEGO
pieces. I tried to keep simple detail the same between the individual
structures. For example, the exact same door button panel pieces are
used both on this building as well as Wald’s dwelling. I just think
that consistency keeps the entire piece uniform and flowing. I am
particularly fond of the water spicket with operating lever.
|
 |
|
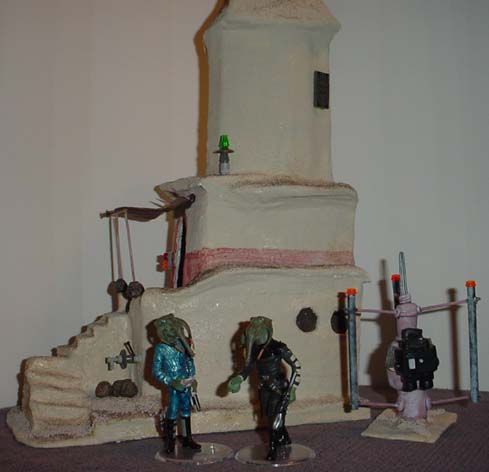
This
is how the entire piece will look at the end of the day. Ultimately,
you will see to the right of this building a parking lot area for a Dewback
or swoop bike etc. To the left you will have the archway that
stretches over the street connecting this structure to the
Ithorian’s home across the way. This will also open the next stretch
of street I will be constructing soon, after I finish this first
stretch. I can’t get too far ahead of myself - one thing at a time.
I am currently working on finishing up on the Aleena tourists and the
archway structure. I will post more updates as soon as possible, so
keep checking back!
|
|
|
|