When we shoot at a target, we are aware of the firing of the gun, and, most times, of the impact of the bullet on the target. Because what happens in between those two events occurs so quickly, it is beyond our ability to detect directly. A lot happens, though, and over the last three centuries or more it has been brought to light by the efforts of many investigators, working in many disciplines. We as shooters are the happy beneficiaries of those studies, but what, exactly, is it that we have learned? What does happen in that invisible interval between muzzle and target? Simply put, the bullet flies in an arching curve to the target along a predictable path called a trajectory.
Why does it happen that way? Most shooters are aware of the concept of trajectory, but, with many of us, the details are a little fuzzy. Looking in some details at what goes into causing that trajectory may be of interest to the curious among us. Keep in mind throughout that we are discussing the up and down shape of the flight of the bullet, not the side to side shape. In other words, elevation, not windage.
In order to make these concepts easier to understand, some groundwork needs to be laid, mostly concerning gravity, time and drag.
All objects are attracted to the earth by a constant gravitational force. The force is proportional to the mass or weight of the object. Any object free to fall will do so, and all objects ...cannonball or feather... will fall at the same speed, disregarding any outside force such as wind resistance. Since we are shooters, lets think about bullets. Hold a bullet in your hand, then drop it. It will immediately begin to fall to the ground. Like any object, it starts off slowly and gains speed ...accelerates... as time goes on. This gaining of speed is spoken of as the acceleration due to gravity, and is known to be approximately 32 feet per second/per second. That means that the bullet, which was at rest, speed zero, at the start, will be traveling at 32 feet per second if allowed to fall for one second. If it is allowed to fall for another second, it will also add 32 feet per second to its speed in that second. At the end of the first second, it was traveling 32 feet per second, so if it adds 32 feet per second during the next second, it will be traveling 64 feet per second after two seconds. This continues in the same way with each passing second.
If the bullet started out at speed zero, but was traveling 32 feet per second after one second, it's easy to see that the average speed is 16 feet per second (0 plus 32, divided by 2 = 16) and that it will actually fall 16 feet in the first second. Knowing this, it then becomes possible to figure how far the bullet will drop in any fraction of a second, say 1/100 second.
The acceleration due to gravity is a constant. Can't be changed, no way no how. It begins to occur the instant the bullet exits the muzzle and continues at a perfectly predictable and unvarying rate until the bullet comes to rest and can no longer fall. It doesn't matter what other gyrations the bullet goes through on its flight, it is falling at that rate at all times. In our example, we simply dropped the bullet from our hand. It's vitally important to understand, though, that if we fire a bullet from a barrel and it travels a long distance before striking the ground, it will still be falling all that time at exactly the same rate as the one we dropped.
This is true regardless of the weight of the bullet or the shape of the bullet. These two factors effect the shape of the curve the bullet travels through, but have nothing to do with the rate at which it falls.
The reason we can't see this trajectory we are so interested in is that it happens so quickly. A round ball fired at 1800 fps will strike a 100 yard target in only 0.214 second. That's fast. However, we know that the 1800 fps figure is only true at the muzzle, because the bullet must travel through the air, which, at the speeds of which we are speaking, has enough density to slow the bullet down. The bullet must push the air out of the way in order to reach the target. If we look at the velocity of the bullet at intervals along its path we see that velocity steadily decreases. For our example bullet, the velocity will have dropped to 1105 fps at 100 yards. The resistance to travel caused by the air is known as drag.
Note: It would be wise at this point to explain that the few numbers used in these simple examples were generated using a ballistics program, "Gun Controller® by RSI. The numbers are specific to a .530 inch round ball weighing 223.5 grains, and will hold true for no others.
Drag varies with the shape of the bullet, its actual velocity, the density of the air and other factors not appropriate to this discussion. The mathematics of drag are very complex and most of us will never really understand them. We will have to be satisfied with the results obtained by solving the problem in a cookbook fashion, using either dedicated ballistics calculators or computer software. We must be aware, though, in general, that drag is a variable effect, unlike gravity, and that it is directly involved in creating the shape of the trajectory we are looking at. The longer the bullet stays in the air, the more time drag has to eat away at the initial velocity. This is vital to remember: the further it goes, the slower it goes.
So, what do we understand, so far? The acceleration of gravity is a constant, and the bullet will drop at a predictable rate over any given time interval. Drag is a variable, but works throughout the flight, and the further the bullet flies, the slower it flies. The time of flight is very short. Because we know that the bullet is constantly slowing, we can safely state that for most of the time interval it will be closer to the target than to the muzzle.
Let's put all these parameters together to create a picture of a typical trajectory. Doing it to scale with actual numbers would be best, but that's impractical, here, so we'll rely on a word picture.
Step one is to divide the total time of flight into equal segments. Since we saw that our example bullet took 0.214 second to travel 100 yards, we'll use that time and that range. Divide the total time into 10 equal parts: 0.214 divided by 10 equals 0.0214 second.
Assume the rifle barrel is horizontal, with the bore pointed straight at the X ring of the target at 100 yards. This gun has no sights.
We know muzzle velocity and we know how drag effects it, so we can calculate the loss of velocity over any time period, using our software crutch. That allows us to come up with an average velocity over our time interval, 0.0214 second. Knowing that, we can easily figure how far the bullet actually traveled in the first 0.0214 second. We also know that in that time interval gravity will make the bullet fall a certain amount, because it's falling at a constantly accelerating rate and will do so throughout the flight.
If we were to construct a schematic of this problem, we would mark the distance the bullet traveled and the distance it fell in the first 0.0214 second. We would see that the distance traveled was long because of the high initial speed.
Starting with the velocity at the end of time period number one, we would now calculate the loss of velocity and average speed for the second time interval of 0.0214 second. Using that, we would figure how far the bullet traveled toward the target in that second time interval. That would then be marked on the schematic. It would be obvious that it traveled a shorter distance than during interval number one, because the average velocity was lower. However ...and this is critical to understand... gravity was still accelerating the bullet downward. That's worth repeating: Gravity was still accelerating the bullet downward. As we saw above, the rate of drop increases with time, unlike horizontal velocity, which decreases.
Going step by step, figuring distance traveled and drop for each succeeding time interval, we would then mark on the schematic the position of the bullet at each 0.0214 time interval.
Because the initial velocity is high, the bullet will travel a long distance in the first 0.0214 second, less in the second, and so on. As the bullet flies, it steadily slows down. Because of this, it will travel a shorter distance toward the target during each successive time interval. However, drop continues to increase during each time interval, and must be added onto the total as that time passes.
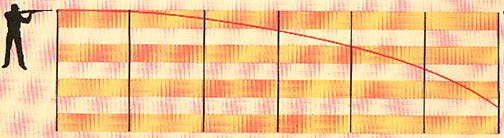
Now, if we connected the dots by drawing a smooth line through them, we would have a representation of the actual path of the bullet. (The one below is representational, only, no calculations for drop or distance traveled were made, but it will illustrate the concepts adequately.)

When we had done this, if we stepped back to look at our handiwork, we would see the bullet path is a curve beginning at the muzzle of the gun and ending at the target, below the X ring. The opening graphic and the one immediately above give a rough idea of the typical shape. Near the gun the ratio of distance traveled compared to the amount of drop would be high, so the curve would be slight, almost flat. At each succeeding time interval, distance would be less, drop would be greater, so the curve downward would be a bit greater that the one before. As we plotted through all 10 time intervals the curve would become more pronounced, becoming quite marked near the target. There, the ratio of distance traveled to the drop would be quite low, compared to the initial one near the muzzle. That's what defines the loop in the trajectory.
Such a curve, beginning small and with increasing curvature along the path, is similar to a parabola. All bullets describe this curve as they fly. Only the rate and degree of curvature varies from bullet to bullet.
Two points need to be made in order to help us understand how we apply all this to our shooting. Much of any discussion such as this deals with the theoretical ideal trajectory, that trajectory we are attempting to achieve but rarely do. In the end, though, there are practical applications, and we all need to understand how these basic understandings can help us shoot better. Or at least, smarter.
Each individual bullet type has its own unique trajectory. I think in terms of round balls, so we'll consider them. For every size round ball there is one trajectory ....and only one. If we repeat the exercise above, but start with the highest muzzle velocity we can possibly achieve, say 2500 fps for purposes of this example, we'll get another parabola-like curve. If we then move along that curve to the point where the ball has slowed to 1800 fps, we'll find that the two curves ...muzzle velocities of 2500 and 1800... are identical from that point on, a perfect match. When we vary our powder charge and thus our muzzle velocity, we are not creating another trajectory, we are only moving right or left along the same trajectory, the only possible one.
Because the faster ball as described above fits on the left, flatter portion of our curve, we can accurately say our gun shoots "flatter". Over that section of the path from muzzle to target, since muzzle velocity was higher, time to target will be less, drop will be less, so she shoots "flatter". And she really does. But it's all on the same trajectory. We pick the *section* of the trajectory we will use, depending on our needs.
It is instantly obvious from this that there is excellent reason for us to work hard to achieve consistent procedures in our loading. Nothing that happens inside the barrel during firing is of any importance except the speed at which the ball is traveling when it exits the muzzle. Nothing. So, anything we can do to guarantee that the muzzle velocity is the same from shot to shot is critical. Otherwise, we have moved along the trajectory and the shape will be different there, causing us to shoot less accurately.
Because there is only one trajectory for each bullet, we can find out a lot about how that trajectory fits into our shooting. Another word picture, to illustrate the principle, not to scale. Draw an approximate representation of the 2500 fps trajectory on some stiff plastic sheet which you can see through. Cut the plastic along the curve. On a sheet of paper, draw the muzzle of your gun on the left, a target on the right. Connect the two with a straight line. Now, pick out any muzzle velocity on the curve you cut, place it on the muzzle and pin it there, then rotate the cut plastic up or down until the curve hits the target. Bingo, there's the flight of the bullet, at that muzzle velocity and at that range. It's fun to play around with this, choosing various velocities and ranges and watching to see how far above the line the curve will go. It will not be practical, useful information, that is, no real numbers emerge, but it will illustrate the principles very well, and that can't be all bad.
This principle of one bullet, one trajectory applies to all bullets. With conicals, the shape comes into play, as well as the weight, because they are intimately involved with the amount of drag created and the ability to overcome it. However, for any given weight and shape combination, the trajectory will be just as consistent as for the round ball. Both are carved in stone at the theoretical level.
Copyright © B. E. Spencer 2000 All rights reserved.