 When I think of the good old days, my Grandma's cornbread usually pops into my mind. She baked hot bread three times a day every day of her adult life, and she did it better than anyone.
Cooking is a pleasant hobby of mine, and I especially like trying the old foods and methods. Some of the following recipes have been prepared in camp using a Dutch oven, but most are fixed at home, also.
Grandma's Cornbread
When I think of the good old days, my Grandma's cornbread usually pops into my mind. She baked hot bread three times a day every day of her adult life, and she did it better than anyone.
4 tablespoons bacon drippings
2 cups coarsely ground yellow cornmeal, stone ground if you can get it
1 teaspoon salt
1/2 teaspoon baking powder
1/2 teaspoon baking soda
1 large egg
1 1/2 cups buttermilk
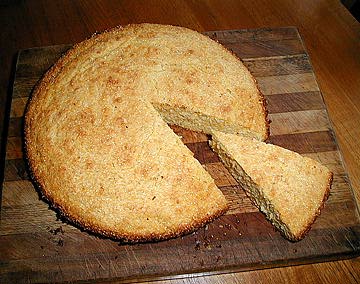
The best thing about Grandma's cornbread was the edge and bottom crust, golden brown and crispy. She achieved that by heating her cast iron skillet and some bacon drippings very hot in the oven while she was mixing the bread. Heat the oven to 450F and put a 9-inch cast iron skillet with bacon drippings into it, just below middle.
While the grease is getting good and hot in the oven, mix the cornmeal, salt, soda and baking powder in a big bowl. Add the egg and buttermilk and stir until just blended.
Remove the skillet from the oven, pour the cornbread batter into the hot skillet. It should snap, crackle, and hiss. If it doesn't, your grease wasn't quite hot enough and you should leave it a little longer the next time. It will overflow the sides and up onto the top of the batter just a bit. That's good.
Now, put it in the oven for 20 to 25 minutes until the bread is firm in the middle and the top is light, golden brown. Serve from the skillet or turn the skillet upside down and the cornbread will slip right out.
For cornsticks instead of one big cake, use the same recipe, but pour the batter into hot, greased cornstick pans and bake for half the time.
Serves 6. The smart ones will have it with a cold glass of buttermilk.
Bannock Bread
Bannock bread is usually made without fat of any kind, only flour and water. This recipe makes a more modern and tasty version, really a biscuit.
1 cup all-purpose flour
1 teaspoon baking powder
1/4 teaspoon salt
3 tablespoons lard or solid shortening
water
Heat the oven to 400F.
Mix the dry ingredients well. Add the 3 tablespoons shortening and cut it in until like coarse meal. Add water to make a soft dough. It can then be either rolled out 1/2-inch thick on a floured board and cut into biscuits or simply dropped from a spoon. Place in a well-greased baking pan and bake for 10-12 minutes or until golden brown on top.
This makes a wonderful camp bread in the Dutch oven baked over an open fire as one large cake. It's easy to enlarge the recipe, just use 3 tablespoons of shortening, 1 teaspoon of baking powder and 1/4 teaspoon of salt for each cup of flour. I usually mix up three cups of flour and nine tablespoons of shortening if I'm doing this. Adding baking powder and salt to the all-purpose flour is the same as using self-rising flour, which you can do if you wish. Simply add only the shortening and water as directed above to the self-rising flour.
For a doubly rich and tasty bread substitute the same amount of butter for the lard or shortening. This makes a delicious, yellow bread, short and crusty.
Old Time Navajo Fry Bread
3 cups all-purpose flour
3 teaspoons baking powder
1 teaspoon salt
1 1/4 cup canned milk (approx.)
Combine dry ingredients. Add enough milk to make a soft dough. Turn onto floured board and knead lightly. Pinch off a ball of dough big enough to pat out to a 9 inch flat cake. Poke a hole in the middle of the cake. Heat lard or mutton tallow in a heavy iron skillet or Dutch oven and test temperature by dropping in tiny pieces of dough. If pieces rise to the top at once, and begin to brown, the fat is ready. Fry dough until brown, then turn once and brown the other side. Drain and serve hot.
Crab Eggs
6 eggs
1/4 cup milk
1/2-3/4 lb crab, real or false
1 package cream cheese
Beat the eggs and the milk together thoroughly. Stir in the crab meat, broken into bite-size bits. Scramble over low to medium heat until not quite set, being careful not to scorch the eggs. Just before the eggs set completely, gently stir in the cream cheese which you have cut into 1/2 inch cubes. Take from the fire before the cream cheese complete melts, serve immediately. Garnish with parsley and grind a generous amount of fresh pepper over it. Serve with English muffins, split and toasted or fried, and jelly. Serves 2-3. Fantastic!
Baked Squirrel or Rabbit
1 squirrel or 1 cottontail rabbit*
oil for frying
1/2 cup all-purpose flour
1/4 teaspoon salt
1/8 teaspoon black pepper
1/4 teaspoon cayenne pepper
Clean and wash an appropriate number of squirrels or rabbits, about 1/2 animal per person. (Make absolutely certain no hair is left on the squirrel.) Cut into serving pieces, usually 6. Thoroughly mix flour, salt and the peppers in a paper sack, add the squirrel/rabbit pieces and shake to coat well. Let sit for 5-10 minutes. Heat oil in a cast iron skillet till moderately hot, add the squirrel and fry until crusty brown, turning as needed.
(If you are lucky enough to have a covered cast iron chicken frier, you can just fry in that, pour off most of the oil when frying is finished, add the water, cover and bake in that pan.)
Place the fried squirrel/rabbit in a casserole dish, add about 2 tablespoons of the oil from frying, along with all the brown crusty pieces, and 1/2 cup of water. Cover and bake in a 350-degree oven for 45 minutes to an hour, or until the meat pulls easily from the bones. Don't let it overcook, or it will be hard and tough.
Remove the squirrel/rabbit to a serving platter. Add 1 tablespoon of the seasoned dredging flour to the pan drippings and heat on the stove top, stirring constantly, until the flour begins to brown. Add 1/4 teaspoon salt. Remove from the fire, add 1 cup of milk and stir thoroughly, then return to the fire and simmer until the gravy is thickened.
Serve with rice, hot bisquits.
*Cooking time, both frying and baking, will depend on the age of the animal. Young squirrel or rabbit will need less time, old squirrel may need more, maybe 1 1/2 hour of baking. Check often for tenderness and don't let it overcook.
Corned Venison
4-5 lb. good cuts of venison
2 quarts water
1/2 cup salt, I use kosher
1/2 teaspoon saltpetre, potassium nitrate
4 bay leaves
6 cloves garlic, sliced
1 1/2 tablespoon pickling spices
Heat the water and dissolve the salt and saltpetre in it. Allow to cool. Trim the meat and place in a 1 gallon zip-top freezer bag. Add the salt solution and the other ingredients. Express all air as the bag is sealed. Place the bag in a shallow dish in the fridge and leave for at least 3 weeks, turning 1-2 times per week.
When the time is up, remove the meat and rinse well, discarding the corning solution. Cover the meat with water in a pot and bring to a boil. Skim any foam. Add to the water 1 tablespoon pickling spices, 2-3 cloves garlic and 1 tablespoon red wine vinegar. Reduce to simmer and cook for 2-3 hours, until desired tenderness is achieved.
This is great as sandwiches, much leaner than traditional corned beef but just as tasty. Beef can be substituted, of course.
Venison Chili
2 lb. venison, lesser quality cuts, shoulder, etc.
4 tablespoons olive oil
1 large onion
2 cloves garlic
5 Tbs. chili powder
2 tsp. cumin
salt and pepper
2 beef bullion cubes
water as needed
cayenne pepper, optional
Trim the venison of all fat and heavy connective tissue and cut it into chunks. Salt and pepper the meat, then chop it finely in the food processor or run it through a meat grinder.
Heat 4 tablespoons olive oil to almost smoking in a skillet, add the meat and break it up as much as possible. Let the meat cook, stirring frequently, until all the juice has come out of the meat, then add the chopped onion and garlic. Cook until the meat is beginning to brown nicely and the onion is transparent.
Add the chili powder and cumin and stir into the meat. Dissolve the bullion cubes in 1/2 cup of boiling water, add to the skillet, then add sufficient water to cover the meat by 1/4 inch. Reduce the heat to a steady simmer and cook for 3 1/2 hours. Add water as necessary.
Taste and adjust the salt, and add cayenne pepper to the desired degree of heat. I like to add about one teaspoon. To adjust the thickness of the chili, sprinkle about 1/4 cup of coarsely ground cornmeal over the chili, stir it in quickly and thoroughly, and continue cooking for at least another 20 minutes.
I like to serve this chili over pinto beans, cooked separately, and with Frito original corn chips on top.
Venison Roast on the Grill
venison roast or loin
olive oil
salt and pepper
Get the grill fired up to moderately hot. Soak hickory bark, twigs or chips in water for 1/2 hour while the fire is getting ready.
Trim the roast of any excess connective tissue, rub it liberally with olive oil, salt and pepper it generously. Place it on the grill on the end opposite the coals, add the hickory to the fire and close the lid. Allow to cook for about one hour. By that time the smoky taste will be adequate, but the meat will not be done.
Remove the meat from the fire and wrap tightly in aluminum foil, making certain the package is well sealed. Return to the fire and continue roasting for another one or two hours, depending on the degree of doneness you desire. This method results in a mild smoked flavor, and prevents the meat from drying out and getting too much smoke, which can cause a bitter flavor. Sealing in the moisture also means the roast will be as tender as could be wanted.
Venison Sausage
2 1/2 lb venison, ground
1/2 lb bacon, ground
3/4 tbsp salt
1 tbsp black pepper
1/4 tsp allspice
1/2 tsp sage
1/4 tsp nutmeg
1/4 cup water
Combine all of the ingredients, mixing well. Shape into patties and fry in a skillet until brown on both sides. Sausage will be slightly pink on the inside. It may also be stuffed in casings and boiled.
I use a meat grinder, and have found that it works well to grind through a larger plate, then mix in the seasonings very well by hand and run through the grinder again, this time with a smaller plate.
Because tastes vary, when you think you have finished it is a good idea to fry small patties and test for seasonings, making any necessary adjustments.
This makes a very tasty, moist and tender sausage which holds together well, and there is minimal shrinkage when it is cooked. It is a mild sausage, and you may want to increase the pepper for a hotter version. I make bulk sausage and fry as patties, and the result is more of a sausage-flavored burger which goes very well with side dishes for breakfast or any meal and also as a sandwich.
Honey Glazed Venison Loin
venison loin
soy sauce
honey
salt and pepper
Fire up the charcoal grill moderately hot. Put some soy sauce in a shallow dish and roll the loin in it, leaving it to marinate for 20-30 minutes while the coals are building. Put the loin on the grill over the coals and cook until browned on the outside. During the last 10-20 minutes of grilling, baste the loin with a mixture of soy sauce and honey. Don't overcook, and be careful about burning the honey glaze.
Pulled Venison BBQ
2 lb. lean venison
1 tablespoon olive oil
salt and pepper
Madeira wine
1 cup BBQ sauce, your favorite
Trim the venison, salt and pepper it and brown it well in olive oil in a skillet. Remove the venison to a crockpot. Deglaze the pan with a splash of Madeira, scraping up all the brown bits. Place the deglazing liquid in a crock pot. Cook, covered, on low for 8-10 hours. The meat will be very tender. Pull the venison into shreds, add the BBQ sauce to the crockpot and cook an additional 1-2 hours.
This makes great sandwiches with a little mayonnaise, pepper and thinly sliced sweet onion on a toasted bun.
Wild Turkey Fillets
Catch one wild turkey. I'll wait.
1/2 cup all-purpose flour
1/8 teaspoon cayenne pepper
1/2 teaspoon curry powder
salt and pepper to taste
2-3 T canola or olive oil, plus
2 teaspoons butter or margarine
Cut serving size fillets parallel with the grain. Place them between layers of wax paper and pound flat, 1/4" thick, or so. Mix the dry ingredients well and dredge the fillets in them. Set aside for 10 minutes while you heat the oil and butter to moderately high temperature. Dredge the fillets in the seasoned flour again, then place in the oil. Saute 4-5 minutes on each side, until golden brown.
Wild Turkey Nuggets
1/4 cup coarse salt (or 3 tablespoons table salt)
about 2 lbs. turkey breast
3/4 cup all-purpose flour
1/8 cup cornmeal
1/2 teaspoon cayenne pepper
1 teaspoon table salt
1/2 teaspoon freshly ground black pepper
1 egg
1/4 cup buttermilk
Peanut oil for frying
Cut turkey breast into bite-size pieces. In a large bowl or pot, dissolve 1/4 cup coarse salt in 1 1/2 quarts of water. Rinse turkey pieces, and add to bowl. Cover and refrigerate for 2 hours. Remove turkey pieces, and rinse under cool water. Clear space in the refrigerator to accommodate a wire cooling rack.
Mix together the flour, cornmeal, salt, black and cayenne pepper, and place in a large resealable plastic bag. Shake. In a medium bowl, whisk the egg, then whisk in the buttermilk. Dip half the turkey pieces in the buttermilk mixture, then place in the plastic bag. Shake, remove and lay out on a wire rack. Repeat for remaining pieces. Put the rack on a jelly-roll pan or cookie sheet, and place in the refrigerator for at least one hour, but preferably two, to set.
Pour peanut oil to a depth of 3/4 inch in a large iron Dutch oven. Place over medium-high heat.
When oil reaches 365F (if you don't have a thermometer, simply wait until the oil starts to smoke - very hot oil is fine for this recipe), arrange turkey pieces in the pan and cover the pan. After 5 minutes, remove the cover. Adjust heat level, if necessary, so oil bubbles at a moderate pace - not too rapidly and not too slowly. Rearrange pieces if some are browning more quickly than others. After 5 more minutes, turn the pieces over. Cook uncovered for 8 to 10 more minutes or until all are golden brown. Meanwhile, thoroughly wash and dry the wire rack while the turkey is cooking.
Remove the fried turkey to the cleaned wire rack set over a jelly-roll pan or cookie sheet. Let drain for 5 minutes, and serve.
Skip's Javelina Stew
Skip Buss
This dish was first tried in an Arizona javelina hunting camp. It really works. Apparently, you can't get it too hot or leave it too long. The ingredients listed are what we used there, but any dish, stew or otherwise, will work if it can be cooked long and slowly.
1 javelina shoulder
potatoes, thickly sliced
carrots, chopped
onion, sliced
white wine, 1-2 cups
water
salt and pepper
hot sauce
3 tablespoons all-purpose flour
Dig a hole in the ground about 18" deep and twice the diameter of a Dutch oven. Build a hot fire of good hardwood in the hole and tend it until you have the hole at least 2/3 full of good coals.
Put the shoulder, or other meat of your choice, trimmed and deboned if you like, in a large cast iron Dutch oven. Add the vegetables, cut to stew size, wine of your choice, flour, salt, pepper, hot sauce to taste and water to nearly cover. Cover the oven with heavy duty aluminum foil, then put on the lid.
Scoop out all but 3-4 inches of coals and set the oven into the hole. Shovel in coals to pile up on the sides till level with the top of the oven, then add more till the top is covered with 3-4 inches of coals. Mix dirt and ashes about half and half and cover the entire mess with 6-8 inches of this mixture. Leave 10-12 hours, then open the pit and carefully clean and then open the oven. Prepare for a feast! The meat will fall from the bones, fork tender, the sauce will be flavorful and thickened, and the vegetables will be firm and tender, not mush. Eat with whole grain bread and butter, wine and gusto.
It is somewhat important to get a kind of seal on the pot, and that is the function of the foil. Don't skip it. Also, an oven with a nicely fitted lid works best. There was more juice in the pot when we opened it than when we started, but the conventional wisdom is that an oven poorly sealed may boil dry and let the food burn.
This works great for dishes you enjoy for an after-hunt breakfast, as you can put the dish to bed after spending a delightful evening around the campfire building coals. It will warm you twice.
Many dishes can be cooked this way, ham hock and beans, venison stew, chicken stew, etc., let your imagination be your guide.
Doves in Wine & Cream
4 tablespoons oil, olive or Canola
2 small onions, chopped fine
2 whole cloves
1 teaspoon peppercorns, cracked
2 cloves garlic, finely chopped
1 bay leaf
2 cups dry white wine
1/2 teaspoon salt
1/8 teaspoon pepper
Cayenne pepper to taste
1 teaspoon minced chives
2 cups cream
Dove breasts
Plan on 4 whole breasts per person, with wings and legs removed.
Saute onions, cloves, peppercorns, garlic and bay leaf in the oil for a short time, then add the doves and brown well. Add the wine, salt, pepper, chives and cayenne, then simmer until breasts are tender, about 30 minutes. Remove doves to a hot serving dish and strain the sauce, if desired. At least, remove the cloves and bay leaf. Add cream to the sauce and heat until about to boil. Pour over the doves and serve. This is really grand served on crisp toasted homemade bread.
Cornbread-Sage Dressing
2 C. dried white bread crumbs
2 C. dried cornbread crumbs
2 C. chicken broth (fresh /canned)
1/2 C. chopped celery
1 small onion, chopped
2 eggs, beaten
2 T. melted butter or margarine
1 teaspoon sage
Salt and pepper to taste
Combine all ingredients in a mixing bowl, mix well. Place in a greased 13 x 9 x 2" baking pan. Bake at 350F for 30 minutes or until set. A toothpick should come out dry. Don't overcook. Makes 6-8 servings.
If light bread crumbs are used (biscuits can be substituted), they and the cornbread crumbs should be allowed to dry for several hours on the counter, or you can dry them for 1-2 hours in a 200F oven.
Don't be stingy with the pepper. The sage can be either fresh-dried or canned (rubbed). Don't use more than called for.
I like to microwave the celery in a little water for 3-4 minutes at high power before adding to the mix.
This recipe makes just enough for 6 people. For an ample supply, double the amounts. This can be mixed, covered and refrigerated overnight before baking.
Cherry Cobbler
1 can red cherries (not pie cherries)
2/3 cup sugar
1 stick butter/margarine
Batter:
1 cup sugar
1 cup all-purpose flour
1/2 cup milk
1 1/2 teaspoon baking powder
1/4 teaspoon salt
In a shallow pyrex baking dish heat the cherries with 2/3 cup sugar until the sugar is well melted. Add the stick of butter and melt it. Make the batter with the remaining ingredients and pour evenly over the cherries. It will sink, but rise to the top as it bakes. Bake for about 45 minutes in a 350� oven, uncovered. Remove when the topping is golden brown and crusty.
I baked this first in a cast iron Dutch oven over coals from a wood fire, and this recipe is an adaptation for the modern oven. Don't be afraid to change cooking time and temperature to suit your taste.
Self-rising flour is nothing but all-purpose flour with the baking powder and salt already added, so you may, if you prefer, simply use self-rising and delete those ingredients.
This dish was a roaring success in javelina camp, Arizona, Feb.1992. I used large black or Bing cherries, cooked it in the Dutch oven for about 35 minutes with mesquite/oak coals. Perfect.
Three Sisters (The best vegetable dish ever.)
1 Butternut squash (about 2 1/2 lb)
1 can baby lima beans, undrained
4 ears fresh corn or 1 can whole kernel corn
2 Tbsp Butter
Salt and Pepper
Peel, seed and cut the squash into bite-size pieces and steam for 15 minutes. Remove the squash, discard the water. Drain the liquid from the can of limas and the can of corn into the pan, add the butter, salt and pepper. Boil till the liquid is almost gone. Add the limas, corn and butternut. Gently stir on medium heat until the dish is hot.
If fresh corn is used, add the corn first, cook for 5 minutes, then add the limas and squash.
Butternut Squash Casserole
1 (2-lb.) butternut squash
1/2 cup brown sugar, firmly packed
1/2 tsp. cinnamon
1/4 tsp. grated nutmeg
1/4 tsp. salt
3 tbsp. butter, melted
Peel, seed, and slice the squash into bite-size pieces. Place on a rack in a pot with a tight-fitting cover, add water to cover bottom of pot, cover and steam until squash is nearly tender, 12 to 15 minutes. Drain the squash well.
Preheat oven to 400 degrees F. Arrange the squash in 1 or 2 layers in a greased shallow casserole. Mix sugar, spices, and salt and sprinkle evenly over the squash. Drizzle with the melted butter. Bake until the squash is tender and somewhat glazed, 15 to 20 minutes. For a deeper glaze, you can put it under the broiler for a few minutes.
I fixed this per directions using a green and white striped crooked-necked cushaw, and it was the best winter squash dish ever.
Simple Chicken and Dumplings
Boil chicken bones to make a good strong broth, about 1-1 1/2 hours. I usually use the bones left from 4 breast halves. Season with plenty of kosher salt. Strain out the bones and meat and boil to reduce the broth by half. Pick the meat from the bones and return to the broth. Mix Bisquick to make a thick dough and roll it out very thin, using a lot of all-purpose flour on the board. Cut into dumplings. Get the broth simmering actively and add the dumplings, along with the excess flour. Cover and simmer for 15 minutes. The flour will thicken the broth, making a kind of thick chicken and dumpling soup. Add a liberal amount of freshly ground black pepper and serve.
General Tso's Chicken
1 pound boneless, skinless chicken breast (2-3 breast halves)
1 egg
enough cornstarch to make a thin batter, approx. 3 Tbs.
1/2 tablespoon chopped ginger
3 cloves chopped garlic
2 stalks chopped green onion
1/2 tsp. cayenne pepper
4 tablespoons soy sauce
3 tablespoons sugar
2 tablespoons vinegar (rice wine vinegar)
1/2 cup chicken stock
1 teaspoon sesame seed oil
oil for frying
Cut chicken breast into big chunks; mix egg and cornstarch to make a medium-thin batter. Dip chicken pieces in the batter and fry in oil till golden brown. Remove the chicken and all but 2 teaspoons frying oil. Cook chopped ginger, garlic and cayenne pepper till light brown. Add soy sauce, sugar, vinegar, green onion and chicken stock. When this mixture boils, mix in remaining cornstarch solution (2 Tbs. cornstarch and 2 Tbs. water). Add cooked chicken, stir to coat well, sprinkle with sesame oil and serve.
Orange Glazed Chicken
6-8 fillets of chicken breast
oil for frying
3 teaspoons butter
3/4 cup all-purpose flour
3/4 teaspoon curry powder
1/2 teaspoon salt
pepper to taste
1/2 cup orange juice, fresh or frozen
1/3-1/2 cup brown sugar
2 tablespoons sherry or other cooking wine
Mix flour, curry, salt and pepper and dredge chicken fillets thoroughly, let set a few minutes.
Mix the orange juice, brown sugar and wine for the sauce.
Heat ample cooking oil with butter added, and fry chicken until golden brown over moderate heat. Pour all but about 2 tablespoons oil/butter from the pan , reduce the heat and add the sauce. Cook, simmering, until the sauce just begins to thicken and will start to coat the chicken. Spoon the sauce over the chicken constantly during this stage, and don't cook it to much, or it will get a burnt sugar taste. Serve hot, over white rice. The sauce goes well over the rice also. A green salad, hot French bread, rice and green peas makes a nice meal.
Grilled Salmon
Salmon fillets
Melted butter
Lemon juice
Salt
Lemon pepper
I sort of bake/smoke the fish in a closed charcoal grill. I build a fairly hot charcoal fire on one end of the grill and place the fillets on aluminum foil on the other end, skin-side-down. After putting the fillets on the grill, I paint them liberally with a mixture of melted butter and lemon juice, half and half. I then salt them and sprinkle liberally with lemon pepper. Then I place well-soaked hickory bark or chips on the coals and close the grill top. I like to make a lot of smoke. I cook the fish for about 45 minutes, never turning it. I grill until the meat is firm and flakes easily with a fork. This makes a beautiful dish, and when you take it up the skin generally stays on the foil. All the mess is on the foil, not on your grill. Many marinades and dressings would be easy to apply using this method.
Copyright © B. E. Spencer 2001 All rights reserved.