
"Waiting/Running" When this button is depressed to display "Running" the program will do its scans for automatic import/export and naming babies. When depressed to "Waiting" it will only do manual commands.
"Enable Auto-Import" When this box is checked, the program is enabled for automatic importing.
"Enable Auto-Export" When this box is checked, the program is enabled for automatic exporting.
"Log Changes" When is box is checked, the program will make a log report showing everything it does or tries to do
"Heartbeat" This is how often the program will scan for naming/export/import when "Running" is depressed. It can be set at 15 second intervals from 15 seconds to 10 minutes.
"Observation Interval" This is how often the observation page is updated. If set to "Heartbeat" it will update before every scan. If set to "15 Seconds" the observation page will be updated every 15 seconds, even if the button is set to "Waiting". This setting works well if you using Wolfling Control as an observation tool with the automatic functions turned off.
"Save Data" Press this button to save all of your settings to a file once you get all the pages set the way you like them.
"Recall Data" Press this button to recall settings you saved from a prior run.
"Exit" Press this button to exit Wolfing Control. I would recommend exiting Creatures first, because Creatures will crash if it is trying to communicate with Wolfling Monitor while it shuts down.
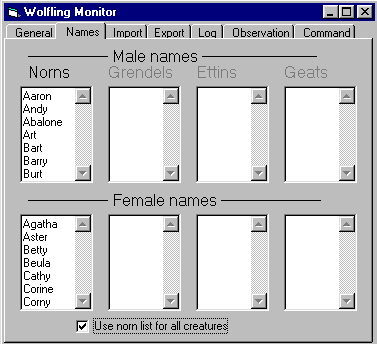
Type in one name per line and press Enter between. The top four boxes are names for male norns, grendels,ettins, and shee/geats. The bottom four boxes are for the females. If you wish to have distinctive names for the various races leave the checkbox at the bottom unchecked. If you wish to use the same lists for all races, check the bottom box.
As you complete each list, Wolfling Control will automatically scan the import and export directories for duplicate names and remove those names from the name lists. It will also remove any names that it uses when it names babies.
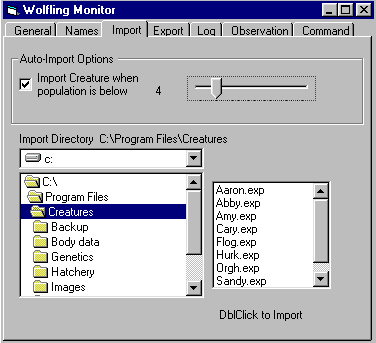
"Import Directory" Set the import directory using the drive and folder boxes at the bottom. Double-click to change the import directory. The available .exp files will be displayed in the lower right box.
"Import Creature when population is below" Leave this box checked to automatically import when the population falls below your desired minimum size. Note that this will cause problems if set higher than the maximum population allowed by the game. IE: in Creatures1 don't set it above 8.
To manual import a Creature, double-click its .exp file name in the lower right box.
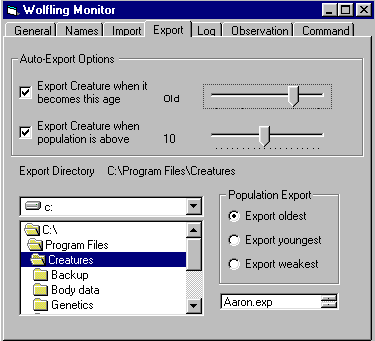
"Export Directory" Set the export directory using the drive and folder boxes at the bottom. Double-click to change the export directory. The first .exp file in that directory, if any, will be displayed in the lower right box.
"Export Creature when it becomes this age" Leave this box checked to export creatures when they attain the age specified by the slider. The age can be set at any age bracket from adolescent to senile.
"Export Creature when population is above" Leave this box checked to automatically export when the population rises above your desired maximum size. Setting this number to a value less than the value on the Import page will cause a creature to be exported and then another imported every heartbeat.
"Poplation Export" Check the criteria to use when export due to population. The default is to export the oldest, but you can chose to export the youngest or the weakest instead.
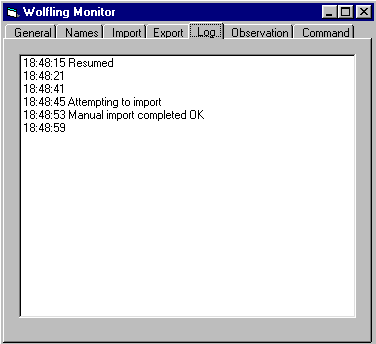
It will also have a blank line for every heartbeat.
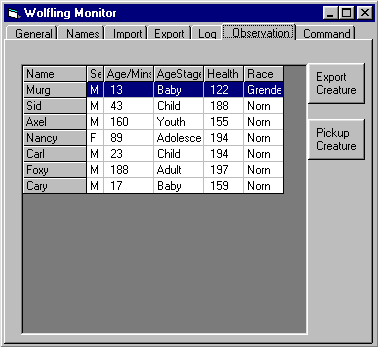
To select a creature in the game, simply click its line on this page. Make sure the "camera" button is clicked in Creatures to change the viewpoint to that chosen creature.
"Export Creature" Manually exports the creature highlighted on the observation page. The creature will be exported to the directory selected on the Export page.
"Pickup Creature" Makes the "hand" pick-up the highlighted creature
 |
| Source code |
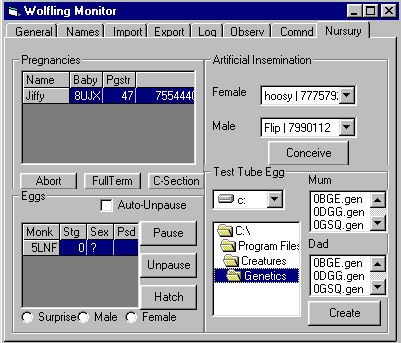
The Pregnancy section shows all the current pregnacies, along with the baby's moniker and the mother's progestrone level. Once the progestrone level reaches 255 she should lay her egg. Click on the desired Momma-to-be to move the camera to her. Click the "Abort" button to abort her baby if it isn't desired, or click "FullTerm" to set her progestrone level to 255 immediately. She should soon lay the egg. If she doesnt lay the egg because she is in a mover, or there are already too many eggs, you can press the "C-section" button to force the egg-laying.
The Eggs section shows all the current norn eggs, along with its stage and sex and whether it is paused. Click the desired egg to move the camera to it. Click "Pause" to pause the egg in stage 0-2 so it doesn't mature. Click "Unpause" to resume the egg's growth. Checking the "Auto-Unpause" box will automatically check for paused eggs (due to norn interference) every heartbeat and unpause them. Pressing "Hatch" will immediately bring the egg to stage 3, where it should hatch unless there are already too many creatures in the world. The selection buttons below the list can be used to select the sex of the baby to hatch from the egg.
The Artificial Insemination section has a two dropdown boxes, one for the un-pregnant female norns that are old enough to conceive, and one for the males old enough to contribute. Select a Female and a Male and press the "Conceive" button to produce an automatic pregnancy, which will soon show up in the Pregnancy section.
The Test Tube Egg section has a directory list where you double click to get to your "Genetics" folder under your Creatures folder. Then Mum list and Dad list will each show ALL of the .gen files available in that folder (both male and female in each list). Choose ANY .gen file in each list and click the "Create" button to create the egg, which will be shown on the camera. This egg will show up soon in the Eggs section. To clone a favorite norn, choose its .gen file for both the Mum and Dad.