I've been working on this for about 1/2 a year. The cabinet is an old
QIX cabinet. I pretty much gutted it, and built a frame to support a
21" computer monitor. I had to remove the monitor's exterior casing to
mount it. I built the computer - AthlonXP2000+, 80GB, 512MB, WinME. I
pulled the keyboard controller (and parts) from a HotrodSE Joystick. I
added a lighted trackball, a Pacman 4-way joystick (the Hotrod's were 8
way), built a spinner from a hacked mouse and old hard drive bearing,
and added a Saitek ST-90 Joystick (after cutting the legs off) for
flightstick games like Zaxxon.
I use the MAME32 arcade emulator to run original game roms. The three
blue buttons work with the trackball as a mouse for moving through
windows and the MAME32 windows interface. I have mapped some primary
buttons for all games such as setting red buttons to "Fire."
I prefer the older arcade games such as Pacman, Galaga, Galaxians,
Zaxxon, Tempest, MoonCresta, Scramble, Centipede, Asteroids, Defender,
Space Invaders, Tron, etc… so I made my control panel to match a
handful of common control panel layouts. You can see the Tempest layout
- spinner and leftmost red and black buttons, Asteroids layout (the two
buttons on either side of the spinner and button below), Pacman
joystick along with either set of red/black buttons to the right for
games like Galaga and Galaxians, a Defender layout (rightmost set of
red/black buttons, black button to the left and down from them for
smartbombs), and center black button for hyperspace. The spinner also
works with the Saitek Joystick for Tron, or red/black buttons for Omega
Race. The blue buttons and trackball for Missile Command and Centipede,
etc… the lower left buttons (black/white) for Hypersports. Buttons on
the leftside and rightside for pinball games. The Hotrod's 8-way
joysticks can be used for games like Crazy Climber, Black Widow, etc… I
also have two buttons on the bottom mapped to "Tab" to open settings
menus within games, and for displaying frame rate. The far right black
button is the "ESC" button to exit games. Finally, I have put a button
on a scrap piece of wood in the coin door opening to "put in quarters."
I have a coin door, but it doesn't fit the opening. I may just put a
"patch" of wood in the opening, then cut it to fit my door.
For those interested, here are some links about MAME and arcade
cabinets and controls:
MAME web site:
http://www.mame.net/
MAME FAQ:
http://www.mame.net/mamefaq.html
MAME32 windows interface:
http://mame32qa.classicgaming.gamespy.com/
Note, do a search for "classic arcade roms" to find games, here are a
few sites:
http://www.rom-world.com/dl.php?name=MAME
http://www.romnation.net/srv/roms/mame.html
Good overview site:
http://arcadecontrols.com/arcade.htm
Also, keyboard hacks and controllers info:
http://arcadecontrols.com/arcade.htm
Spinner mouse hack:
http://www.doughansen.net/arcade/spinner.htm
Saitek ST90 Joystick mount:
http://www.willcoxonline.com/mame/index.html
Buy arcade controls, cabinets, accessories:
http://www.dreamarcades.com/
http://www.retroblast.com/index.php
http://www.gamecabinetsinc.com/
http://www.slikstik.com/
http://www.hanaho.com/Home/index.php
http://www.mameroom.com/home.asp
Controls and interfaces:
http://www.ultimarc.com/
http://groovygamegear.com/webstore/
http://www.oscarcontrols.com/
Artwork:
http://www.mameworld.net/massive/
(Apologies to the artist if I'm wrong, but I think my Marquee came from
here.)
http://arcadecontrols.com/arcade.htm
I figure I have around $600 invested, but it would probably cost a bit
more for most people. I had some computer parts laying
. I
had to
buy motherboard, processor and memory (~$110), cabinet ($25 - look long
enough and you'll find a cheap one!), Plexiglas ($35), Trigger Joystick
($10 - WOOT), 4-way Pacman Joystick ($25 - ebay), Trackball and
mounting plate ($100 new, ebay), HotrodSE (~$75 - ebay), 21" Monitor
($1, actually, I got 6 monitors - 17" to 21" for $1, ebay, Plus $10
pickup fee, and $30 gas), Paint (~$20), fullrange speakers ($10),
T-molding ($15) and $8 for cabinet locks. Including $130 for computer
components I already had (video card, sound card, hard drive, CD-ROM,
Floppy drive), brings that to roughly $600, but YMMV ;-)
As a speaker builder, I actually did mess with the sound a little bit.
I used an SB PCI16 soundcard which has a small (maybe 2 or 4 watts) amp
built into it. I used to use it for SpeakerWorkshop. The
cabinet
came with the marquee light and speakers still installed. The speakers
were just coaxial Audiovox car door speakers that sounded mediocre, and
had no bass. I found some RadioShack dual cone 8" drivers on clearance
(model 40-1271c) that I read had decent bass for a full range. They
did, but they had a convex shaped frequency response (which looked
somewhat like the top half of a circle) that peaked between 1kHz and
4kHz. I measured them with SpeakerWorkshop and designed some response
shaping circuitry (parallel inductor, cap and resistor) placed in
series with the drivers to decrease output throughout the midrange.
They now sound very respectable - Great for Arcade speakers. A little
boost in the bass and treble helps a bit, too.
I printed the full size marquee artwork on the office
plotters.
Don't tell anyone ;-) Actually, I printed about 6 of them
that I
have stashed on the inside of the back door to the cabinet. I
can
pull one out and change it if I like.
Pictures:
Partially Completed Front
before
adding control panel or T-molding. You can see the coin box
(later removed to make more room for the computer). You can
also
see where I masked off the edges of the monitor screen so I could spray
paint the border around the screen.
Another Partially
Completed Front
with New T-molding trim installed. Also note that the monitor
bezel has been spray painted black on the backside which gives it a
nice glossy finish on the front. Just don't forget to mask
off
the monitor viewing area with newspaper. ;-)
Control Panel
Dimensions (side)
and button layout
dimensions.
Note that the panel width is shown in the "button layout dimensions."
Control Panel Mockup.
Since
Quarters where about the same size as the buttons with trim, I used
them to make a mockup of the control panel. Where the blue
"mouse" buttons go, you'll notice some overlaid coins. I
didn't
know if I wanted the 3 buttons in the same row, or offset for better
ergonomics. I chose the offset version for comfort.
This is
why it's imperative that you create some kind of mockup of your control
panel - to make sure buttons are comfortably spaced and not interfering
with other buttons.
Control Panel Button
Layout.
This shows the button's keycode, and description of general action.
Control Panel
being
primed. I was going to put two buttons on each
side. One
for arcade flippers, and a second for "nudge" buttons (for playing
windows pinball or any pinball with "nudge" buttons).
However,
when I did a "dry fit" with all buttons and joysticks, I found out that
the left button on top clashed with the upper button on the left
side. I had to fill in the hole I made, and now use the
button on
top for a "nudge" button. If only my mockup had been a full
size
3-dimensional mockup.
Underside of Control
Panel.
You will note the routed areas for joysticks. Another
unplanned
thing you'll notice is the slots cut into the rear. That was
because with the tilt of the top, the Joystick bodies tilted rearward
and contacted the rear "wall" of the control panel.
Therefore, I
had to cut those slots to allow the joystick body to angle
back.
I was lucky that I could still get switches on them, so another word of
warning, allow extra space around joysticks.
Electric Plug.
You have to have
some way to power your machine. Mine has a switch under the
front
left lower corner. You can see it to the right of the
outlet. I installed a new outlet, but the other wires
including
the wire for the fluorescent light (running up the right wall), and the
power cord plug were included with my cabinet although with a complex
wiring scheme that had off switches installed on the rear door and the
coin door so that the machine would turn off if these doors where
opened. This "off" system wasn't working quite right so I
removed
it and rewired the machine much simpler and installed a two plug outlet
in a grounded electrical box. I just have to be careful not
to do
much inside the cabinet without unplugging it first. Most
wire is
covered, but the switch connections are touchable though you'd have to
work at it.
Cabinet Interior Picture
from the rear.
You can see the new speakers,
wires
and response shaping circuitry attached to the speakers. I
removed the large coin box so the computer actually rests in a front to
back position, now, and is screwed to the bottom of the cabinet so it
won't fall over if the cabinet is tilted.
Coin Door.
This one doesn't fit
my coin door opening, so eventually I'll fill in the front opening with
a piece of wood, and cut a proper sized hole for this coin
door.
Then I can have true arcade experience of putting coins in the machine.
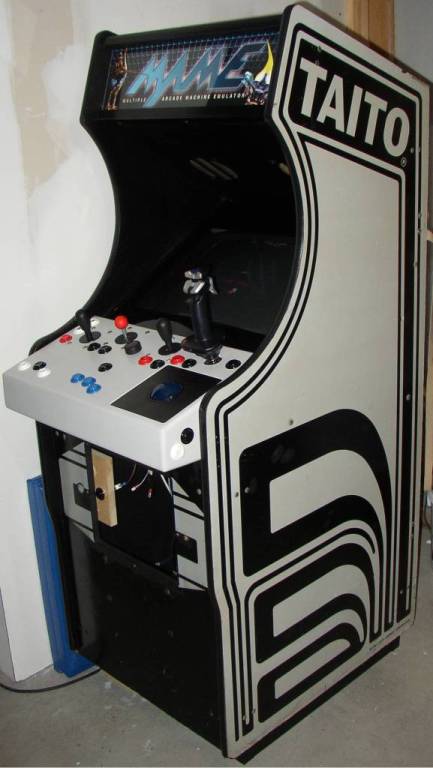
Front You
might recognize
Pacman on the screen.
Front showing
lighting.
This picture was taken without a flash so you could see the marquee
lighting and the trackball glowing.
Updates:
My 21" monitor bit the dust, but luckily, I had a 20" leftover from my
"pallet" of monitors. It was a bit of a pain to install it
because I had to remove my control panel and slide the Plexiglas
out. The Plexiglas went in so tight that I had to put a block
of
wood on it and hammer it in. So needless to say, I had to
hammer
it back out, install the monitor, then hammer it back in. It
slides in plastic grooves, but the grooves are tight. That's
another way of saying I probably bought some Plexiglas that was a
little thick. ;-)
Things
I would do differently:
I have noticed a few things I would change on the control panel if I
build another one. For one, the exit button is on the upper
far
right. For single person play, it's okay where it
is. You
won't be in danger of pressing it (except occasionally using a
trackball for a golf game). However, when you have another
person playing alongside or watching you, they might have a tendency to
put their hands on the edge of the cabinet at approximately the same
spot which promptly boots you out of your game - Especially when you're
playing well. ;-)
Maybe I'll switch it out with one on the bottom using the control
config file. Better yet, if I make another control panel,
I'll
probably put the button on the bottom (towards the cabinet so as not to
hit it when I'm sitting on my stool) so the top is less cluttered.
Also, I probably shouldn't have put much of a slope on the top, or I
should have drilled the Saitek joystick hole straight down
perpendicular to the floor instead of
perpendicular to the top. It's a bit awkward pulling the
joystick
in the down direction. I'll need an angled spacer underneath
on
which to screw it down. I have to say, except for the cheesy,
light construction quality (it feels like it might break if you yank it
around too much), it's the perfect joystick for a MAME
cabinet!
Also, I should make the controller a
little taller so buttons on the sides don't clash with buttons on the
top. (I had to eliminate a button on the left side due to
conflicts with the top buttons.)
I originally wired the left two
joysticks and the adjacent
black buttons (for left right movement) all in parallel. In
other words, the left button and the left directions of both joysticks
where wired to the same key code. Ditto for right and the up
directions and down directions of the joysticks. This worked
great on everything except Defender and Stargate and you may be able to
guess why. Normally these games have an up/down (only)
joystick,
and a
button adjacent to them for reverse. I set the menu controls
to
have that "left" black button (normally the "left" control) become the
reverse button. Fine. Where I ran into trouble is
that it's
hard to only move an 8-way joystick only up and down. In the
excitement of game play, I have a tendency to yank the joystick to the
sides as well. I think you can see where I'm going.
Since
the left joystick switch is wired to the left black button, whenever I
accidentally pushed the joystick left, I caused the spaceship to
reverse (because I had programmed "left" to be "reverse") - Really
quite annoying!!!. Now I have changed that left button and
wired
it to a separate spare key control. I set it up globally to
be
the "left" direction whenever it's depressed. And in Defender
and
Stargate, I've set it up to be reverse. Much, much better.
I almost wish I had switched the position of the spinner and the 4-way
ball top joystick. I was trying to maintain the exact spacing
of
the tempest buttons to the left relative to the spinner, but other
buttons don't necessarily have exact spacing (left right buttons, and
fire buttons are not exactly spaced with any particular game as many
control panels had different dimensions for these buttons,
etc...). I feel off center playing Pacman. Speaking
of the
4-way, another thing that would clean up the control panel would be to
use an Ultimarc J-stick. It's 4-way, 8-way convertible, and
has a
ball top. Of course, don't parallel the wiring the way I did,
you
would just use the 8-way's wiring. I wish I could try a
J-stick
to see if it still feels just like a pacman joystick. The
Pacman
stick I'm using is great! It has just the right amount of
"throw"
to feel like an original Pacman stick. Then again, it's the
very
stick used in the Ms. Pacman/Galaga combo machine!
I should probably have placed the three blue "mouse" buttons slightly
closer together. My fingers have to spread uncomfortably to
play
Missile Command. Of course the original game had those tiny
raised buttons whereas I'm using standard buttons. While we're on the
subject of buttons, one could probably do away with the two white
buttons on the lower left. I use them for the Hyper Sports,
and
Hyper Olympics games, but most any set of three buttons could be
programmed for these. It is nice having them at that
location,
though, and personally I'm going to keep them. If anything, I
might separate them more on a new control panel. Keep in mind
that you still need the black button along with the red button to the
left and up, for Tempest. I love that game and it's great
having
the original button layout. Someone going for minimalist
controls
may want to delete them and just use the red and black buttons to the
right.
Finally, I should have put a little more distance between the Saitek
joystick and the red and black buttons adjacent to it (to the left of
it). At the time, I didn't really consider the fat lower
section
of the joystick covering the buttons. I use a rubber band to
pull
the joystick out of the way when I play defender. Maybe I
could
push it a little further up and right on a new cabinet. The
outside location of the joystick doesn't feel bad at all, at least for
righties - you lefties may want to put it more to the middle.
Just keep it to the right of the spinner for Tron.
Frankly, I thought about making interchangeable control panels by
removing the keyboard controller and mounting it in the cabinet, and
connecting all wires through a Molex connector. Perhaps
not. I like all controls ready available. Otherwise
I would
be unplugging the joystick, spinner and trackball as well when I switch
control panels.
Oh well, live
and learn. Otherwise, this thing plays great!!!
There's
nothing like the feel of real arcade controls on a large stable cabinet
for realistic game play!!!
To sum up the above for a more minimalist control panel:
- Eliminate one joystick by using an Ultimarc J-stick for the
right-hand 8-way joystick.
- Eliminate the two lower white buttons If Hyper
Olympics-type
games don't interest you.
- Eliminate the lower left black button and the left-most red
button if authentic Tempest control layout doesn't interest you.
- Put the J-stick where the spinner is, and relocate the
spinner to
the left and up
- If you're not interested in Defender or Stargate, you could
eliminate the upper right pair of red/black buttons as well.
Possible Control Panel
Layout
As a side note, I'd love to try a VGA arcade monitor someday, but I
wonder how vector graphics would look on it. I think to keep
things simple, using a computer monitor and direct 3d effects for
raster lines is the best option. Vector games look great on a
computer
monitor. I'm just afraid they will look too coarse on an
arcade
VGA monitor. For truer arcade feel, an arcade monitor (or
Wells
Gardner VGA monitor) using an Ultimarc ArcadeVGA2 card should be the
ultimate!
Another side note. I've been trying to get my Dragon's lair
CD to
work on this system, but I'm having trouble with the sound.
That's one of the reason's I've wired my Pacman and left joystick to
use the Numpad keys! I've recently acquired a copy of
Win98SE,
and I think I'll install it instead of using WinME. DOS games
were always a bear in WinME since they "hid" DOS in it!
TOP OF THE PAGE
Home
Last Updated 08/20/11